Archive for July, 2017

How to Install Linux Bash in Windows 10

July 13th, 2017 by Admin

Starting from Anniversary Update, Windows 10 includes a subsystem to run Linux Bash shell directly. As developers we can all get excited about Bash on Windows, because we can now use GNU command line tools like awk, sed, grep, vi, etc. However, Bash is not enabled by default, and we have to turn it on before using Bash in Windows 10. Let’s walk you through how to install Linux Bash in your Windows 10 computer.

Updated: Starting with Windows 10 Fall Creators Update, you no longer have to enable Developer Mode in the Settings app to use this feature.

Step 1: Enable Developer Mode

Press the Windows + I hotkey to open the Settings app. Head over to Update & security > For developers, and then select Developer mode.

windows-10-developer-mode

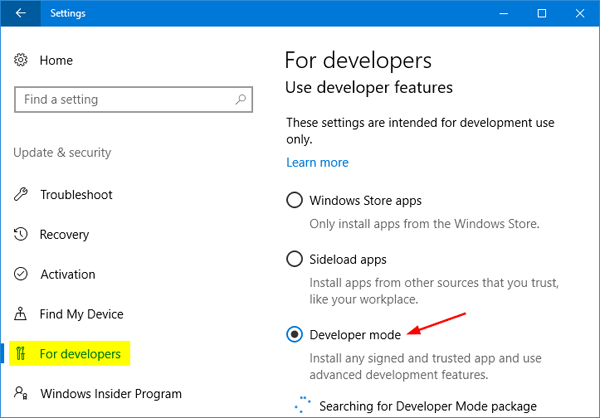
If developer mode is turned off on your computer, the Windows Subsystem for Linux will be disabled as well, which preventing you from accessing to the Linux Bash shell.

Step 2: Enable Windows Subsystem for Linux

Open the Control Panel. Select Large icons under the View by option, and then click Programs and Features.

programs-and-features

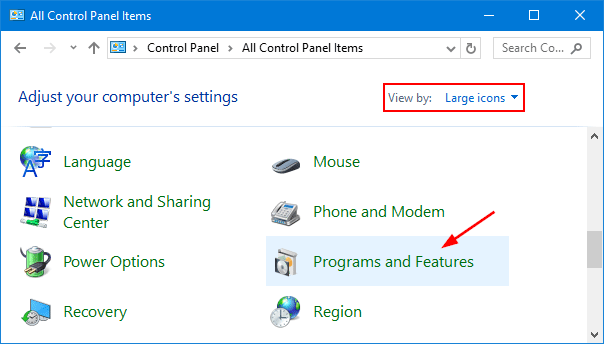
Next click Turn Windows features on or off link in the left sidebar.

turn-windows-features-on-or-off

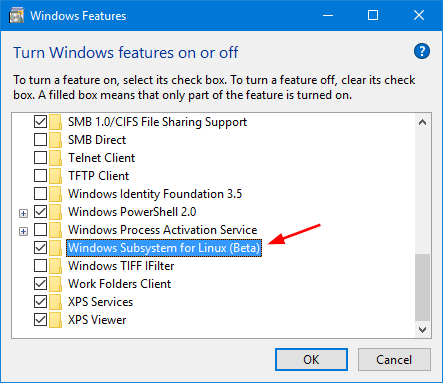
A new window will open. Check the “Windows Subsystem for Linux” option and click OK.

windows-subsystem-for-linux

Once that’s done, you’ll be required to restart your machine.

Step 3: Install Bash in Windows 10

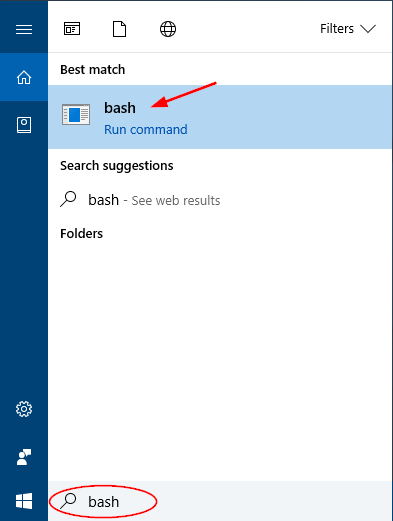
When rebooting is complete, you need to install Bash itself. To do that, type bash in the Cortana Search box on your taskbar, and then click its icon.

search-bash

When you’re asked if you want to install Bash, just type y and press Enter. Windows 10 will download Bash from Windows Store and install it on your computer.

install-bash-on-windows-10

After Bash is installed, you’ll be prompted to create a user account and password that you’ll use in the Bash Shell. This account doesn’t have to be the same as your Windows account.

Once you’re done, you can now open the Start Menu and search for Bash again. You’ll find a “Bash on Ubuntu on Windows” shortcut that launches the shell. That’s it!

Import Chrome / Firefox / IE Bookmarks and Passwords into Microsoft Edge

July 10th, 2017 by Admin

Is there any way to export favorites, bookmarks and passwords from Chrome to Edge in Windows 10? Since the public release of the Windows 10 Creators Update (version 1703), this is now possible. This tutorial will show you how to import bookmarks and passwords from Chrome, Firefox, Internet Explorer to Microsoft Edge in Windows 10, without using third-party software.

How to Import Chrome/Firefox/IE Bookmarks and Passwords to Edge?

  1. To get started, open Microsoft Edge and click the More button (three dots icon) near the top right-hand corner of the browser window, and then choose Settings.

    edge-settings

  2. Then select the Import from another browser button.

    import-favorites -into-edge

  3. Under the “Import your info” section, you can see the browsers that have already been installed on your local PC. Choose the browser you want to import bookmarks/passwords from, and click Import.

    import-bookmarks-passwords-into-edge

    You can alternatively use the Import from file button to import a bookmarks file you previously saved with another browser.

  4. After a while, you’ll find the imported bookmarks appear in a newly-created folder named “Imported from browser name” under the Favorites section.

Using this method you can easily import bookmarks/favorites, browsing history and saved passwords from Internet Explorer and Chrome to Edge. But the current version can import only bookmarks from Firefox. If you want to export or reveal saved passwords in Firefox or other browsers, you can try the all-in-one password utility – Password Recovery Bundle. That’s it!

How to Batch Rename Multiple Files in Windows 10

July 6th, 2017 by Admin

How can I quickly rename a bunch of files at once? Of course, you can right-click each file and rename it one by one. But this could be really painful and time-consuming if you need to rename hundreds of files. In this tutorial we’ll show you 2 quick ways to batch rename multiple files in Windows 10, without using third-party software.

Method 1: Batch Rename Multiple Files in File Explorer

Just put all the files which you would like to rename, in a single folder (if they are scattered). Follow these steps and you can quickly rename all files at once in File Explorer:

  1. Open File Explorer in Windows 10 and browse to the folder where the files you need to rename.
  2. Press Ctrl +A to select all your target files. Once all the files are selected, right-click on the first file and select Rename from the context menu (you can also press F2 to rename the file).
  3. You’ll notice only the file name itself is highlighted, not the extension. If you want to rename the full name including extension, press Ctrl + A to select all. Now type a new file name and press Enter.

    rename-multiple-files

  4. It will rename the rest of the files based on the first filename, and add the sequential number to the end of each file.
  5. multiple-files-renamed-at-once

If you don’t like the new name, you can undo the renaming and get the old name back, but you have to act now. Just right-click an empty area of File Explorer, and choose “Undo Rename” from the context menu.

Method 2: Batch Rename Multiple Files Using Command Prompt

Another fast way of batch renaming multiple files is using Command Prompt. This method is extremely easy especially if you want to change extensions of multiple files at once. You could follow these steps:

  1. Open File Explorer and browse to the folder where you want to change the name of files.
  2. Hold down Shift on your keyboard, right-click an empty area in that folder, and then choose “Open command window here” from the context menu.

    open-command-window-here

    Note: In Windows 10 Creators Update, the “Open command window here” option is removed and you can restore it by following this tutorial.

  3. When the Command Prompt window pops up, you can use the ren command to batch rename multiple files at once. For example, you have a bunch of .html files that you want to turn into .htm files. You could use the following command along with the * wildcard:

    ren *.html *.htm

    rename-file-extension-in-command-prompt

  4. Just a while all your files are going to be converted from one extension to another. That’s it!

How to Backup / Restore Sticky Notes in Windows 10 / 8 / 7

July 5th, 2017 by Admin

How can I transfer old sticky notes to a new computer? Looking for a way to import the legacy sticky notes into the new Sticky Notes application? This tutorial will show you how to backup and restore Sticky Notes on any computer running Windows 10, 8 or 7.

Part 1: Backup Sticky Notes

  1. Before get started, you need to close the Sticky Notes application if it’s running.
  2. Press the Windows key + R to open the Run box. Copy and paste one of the following path and press Enter.
    • In Windows 7, Windows 8, and Windows 10 version 1511 and earlier:
      %AppData%\Microsoft\Sticky Notes
    • In Windows 10 Anniversary Update (Build 1607) or later:
      %LocalAppData%\Packages\Microsoft.MicrosoftStickyNotes_8wekyb3d8bbwe\LocalState

    open-sticky-notes-location

  3. Now, Windows Explorer will open the location where your sticky notes are stored. Just copy StickyNotes.snt or plum.sqlite to a backup location of your choice.

    StickyNotes.snt

Part 2: Restore Sticky Notes

If you need to restore your notes to another computer for whatever reason, you can easily copy the same file you backed up earlier to the same directory on that computer. Before you copy the file, make sure the Stick Notes app isn’t running.

Part 3: Import Old Sticky Notes (StickyNotes.snt) into Windows 10 Anniversary Update or Later

  1. First of all, close Sticky Notes application. Press the Windows key + R to open the Run box. Copy and paste the following path and press Enter.
    %LocalAppData%\Packages\Microsoft.MicrosoftStickyNotes_8wekyb3d8bbwe\LocalState
  2. This will open the LocalState folder in File Explorer.

    plum.sqlite

  3. From there create a new folder named Legacy. Copy and paste the backed up StickyNotes.snt file into the Legacy folder, and rename it to ThresholdNotes.snt.

    import-sticky-notes-into-windows-10

  4. Start the Sticky Notes app. It will read the legacy .snt file and transfer the notes to the database file plum.sqlite automatically. That’s it!

2 Ways to Prevent Access To Drives in My Computer in Windows 10

July 5th, 2017 by Admin

Is there a way to choose what local drives may be viewed by specific users? How can I restrict access to certain drive on the machine? Windows 10 comes with a group policy setting that allows you to prevent other users from accessing to the content of selected drives. This is useful if you share your PC with others, but you want to restrict access to a drive for other accounts in the same computer.

Note: This setting won’t prevent users from using programs (for example, Command Prompt) that access the local drives. If you need to a professional folder protection software, you can try Protect My Folders.

Method 1: Prevent Access To Drives in My Computer in Windows 10 Using Group Policy

  1. Press the Windows key + R to open the Run box. Type gpedit.msc and hit Enter.

    gpedit

  2. Once Local Group Policy Editor is launched, use the left pane to navigate to User Configuration > Administrative Templates > Windows Components > File Explorer. Now go to the right pane and scroll to find “Prevent access to drives from My Computer” and double-click on it.

    prevent-access-to-drivers-my-computer

  3. When the configuration box pops up, change the setting to Enabled. Next move to the Options section at the bottom left, and use the drop-down menu to select the combination of disk drives for which you want to prevent user access. Click Apply and then OK.

    restrict-access-to-drives

  4. The policy setting will take effect immediately, no restart is required. When a user try to open the restricted drive in File Explorer, they will receive the following error message:

    This operation has been cancelled due to restrictions in effect on this computer. Please contact your system administrator

Method 2: Prevent Access To Drives in My Computer in Windows 10 Using Registry Editor

  1. Press the Windows key + R to open the Run box. Type regedit and hit Enter.

    regedit

  2. Once the Registry Editor window is launched, navigate to the following key:
    HKEY_CURRENT_USER\Software\Microsoft\Windows\CurrentVersion\Policies\Explorer

    If the Explorer key does not exist, you can right-click on Policies, select New -> Key and name it Explorer.

  3. Right-click on the Explorer key in the left pane, and then select New -> DWORD (32-bit) Value, name it NoViewOnDrive.
  4. Next, double-click NoViewOnDrive and set its value according to following list (in Decimal):

    A: 1, B: 2, C: 4, D: 8, E: 16, F: 32, G: 64, H: 128, I: 256, J: 512, K: 1024, L: 2048, M: 4096, N: 8192, O: 16384, P: 32768, Q: 65536, R: 131072, S: 262144, T: 524288, U: 1048576, V: 2097152, W: 4194304, X: 8388608, Y: 16777216, Z: 33554432, ALL: 67108863

    NoViewOnDrive

    For example, if you want to lock drive D, you have to set the value to 8. If you want to lock both Drive A and drive D, you would add 1 (A) + 8 (D) which means the value should be set to “9”.

  5. When it’s done, close Registry Editor. Restart Windows for the change to take effect.

How to Disable Websites Asking for Your Location in Windows 10

July 4th, 2017 by Admin

How to stop websites from asking your location in Chrome? While surfing online, you may noticed that some websites ask for permission to access your location. If you’re concerned about websites tracking your physical location, you can configure your web browser (Chrome, Edge, Firefox, Internet Explorer) to disable websites asking for your location in Windows 10.

Part 1: Turn Off Location Tracking in Google Chrome

  1. Click on the three-dot menu on the right-hand side of the address bar, go to Settings.

  2. Scroll till the end and click on Show advanced settings.

  3. Click on Content settings and under the Privacy section.

    content-settings

  4. Scroll down to the Location section and select “Do not allow any site to track your physical location“. Now click Done

    chrome-not-track-physical-location

Part 2: Turn Off Location Tracking in Microsoft Edge

Just like other Windows 10 Store apps, Microsoft Edge’s location tracking settings cannot be controlled from within the browser itself. You have to turn off location tracking through the Settings app. Follow these steps:

  1. Open the Settings app and then click Privacy.

    privacy-settings

  2. Select Location tab in the left side. Scroll down to the “Choose apps that can use your precise location” section and turn the slider next to Microsoft Edge to Off.

    disable-edge-use-location

Part 3: Turn Off Location Tracking in Firefox

  1. Open your Firefox browser. Type about:config into the address bar and press Enter.

    firefox-config

  2. You’ll see a warning message “This might void your warranty!“. Just click I accept the risk and move on.
  3. Type geo.enabled into the Search box and hit Enter. The Geo Enabled option should show up. Double-click that option with your mouse to disable it.

    firefox-geo-enabled

Part 4: Turn Off Location Tracking in Internet Explorer

  1. Open your Internet Explorer. Click on the gear shaped Settings icon in the upper-right corner. From the drop-down menu, select Internet options.

    internet-options

  2. The Internet Options dialog box will open. Click on Privacy tab and check the box “Never allow websites to request your physical location“. Click OK and you’re done!

    allow-website-request-physical-location