Archive for May, 2015

How to Fix IE Issue “This program couldn’t be downloaded”

May 4th, 2015 by Admin

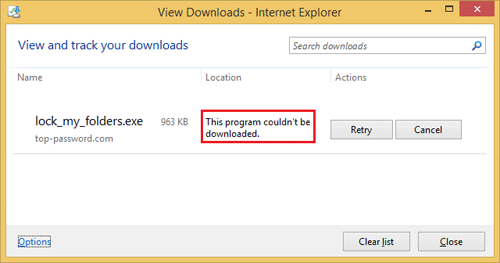
If you’re using Internet Explorer, you might frequently experience an issue with your download: “This program couldn’t be downloaded”. The file would appear to download but then after the last bit was done, it would fail and no further indicators of what the problem was.

couldnt-be-downloaded

I contacted Microsoft support and they suggested me to install the most recent cumulative security update for Internet Explorer. But it also doesn’t solve the problem. Eventually I figured out a way to fix the problem. Here’s how:

  1. From Internet Explorer main menu, click on Tools and choose Internet Options.
  2. Click the Advanced tab.

    don't-save-encrypted-pages

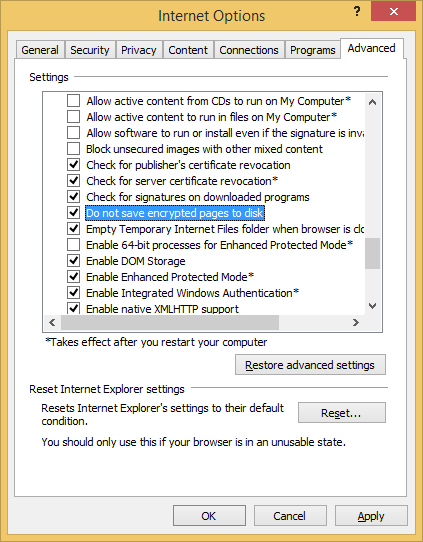
  3. Check the “Do not save encrypted files to disk” option, and then click OK.

Restart your Internet Explorer and you should then be able to download your application without any issue.

How to Disable Driver Signature Enforcement in Windows 10/8/7 64-Bit

May 4th, 2015 by Admin

In 64-bit operating systems starting with Windows Vista, Windows will load a kernel-mode driver only if the driver is signed. It was designed to prevent unsigned device drivers (or kernel modules in general) from being loaded and executed. After installing an unsigned device driver, it will always result in a blue screen of death during the startup process.

The problem is that many devices ship with unsigned drivers. Today, we’ll show you 2 methods to disable Driver Signature Enforcement in Windows 10, 8, 7 (64-bit) so you can then install / load unsigned drivers without problems.

Option 1: Disable Driver Signature Enforcement Completely

  1. Open a Command Prompt with admin privileges. In Windows 10 or 8, just press the Windows key + X and then select “Command Prompt (Admin)”.
  2. Type in the following command and press Enter.
    bcdedit /set testsigning on

    You should receive “The operation completed successfully” message. If you see a message saying the value is protected by Secure Boot policy, then you have to turn off Secure Boot in the UEFI/BIOS, before disabling Driver Signature Enforcement.

  3. Close the Command Prompt and restart your computer. From now on, you will be able to install or run any unsigned driver without problems.

    If you need to enable the Driver Signature Enforcement again, run this command instead:
    bcdedit /set testsigning off

Option 2: Disable Driver Signature Enforcement Once

If you don’t want to use the method above to permanently disable Driver Signature Enforcement, here is a solution for you to temporary turn off Driver Signature Enforcement to install unsigned driver:

  1. Press the Windows key + R to bring up the Run box. Type shutdown /r /o and hit Enter.
  2. Windows informs you that you are about to be signed off. Click Close.
  3. Once your Computer has rebooted you will need to choose the Troubleshoot option.

  4. Then head into Advanced options.

  5. In the Advanced Options window, choose Startup Settings.

  6. Click the Restart button on the Startup Settings screen to reboot your computer again.

  7. After restart in Startup Settings windows, press the F7 key on your keyboard to select “Disable driver signature enforcement“.

  8. Your PC will then reboot. Proceed to install your unsigned drivers. During the installation procedure, Windows will inform you that can’t verify the publisher of this driver software. Just ignore the warning message and choose “Install this driver software anyway” to complete the installation.

Keep in mind that after the next restart, Driver Signature Enforcement will be automatically enabled again to prevent new drivers from being installed, but Windows will keep using any unsigned drivers you’ve already installed.

How to Uninstall and Deactivate Your Windows Product Key

May 3rd, 2015 by Admin

Need to transfer your Windows license from one computer to another? Before you sell or recycle an old computer, you might want to take your Windows product key and use it on a different PC. In this article we’ll show you how to uninstall / deactivate your Windows product key, and then install it on a new computer.

Part 1: Uninstall Windows Product Key

Make sure you backup your Windows product key before deactivating. If you’ve lost your key, you can recover it with the KeyFinder Plus program. Here’s how to deactivate Windows license:

Open an elevated Command Prompt and enter the following command:
slmgr /dlv

slmgr

Windows will open a message box with Software licensing information, write down the activation ID.

windows-activation-ID

To uninstall your product key you need to use the /upk switch, along with your activation ID:
slmrg /upk {Activation ID}

uninstall-product-key

If everything goes well you’ll get a pop up window saying that your product key has been uninstalled.

Part 2: Install Windows Product Key

Installing your product key on your new PC is just as easy, all you need to do is fire up an administrative Command Prompt and use the /ipk switch.
slmrg /ipk {Windows product key}

install-product-key

NOTE: You need to type in the product key. Not the activation ID you got from the uninstall step.

If your key is valid you will be told that your key was installed.