Posts Tagged ‘windows 10 start menu’

How to Lock the Start Menu Layout from Being Changed in Windows 10

November 22nd, 2014 by Admin

With Windows 10, the Start button and the traditional Start Menu are back, and it’s much more customizable than it ever has been before. In our previous post we’ve covered how to customize the Start Menu in Windows 10. After personalizing and organizing the Start Menu, you might want to lock the Start Menu layout to prevent any accidental changes. Here are 2 simple ways to lock the Start Menu layout.

Method 1: Using GPO to Lock the Start Menu Layout from Being Changed

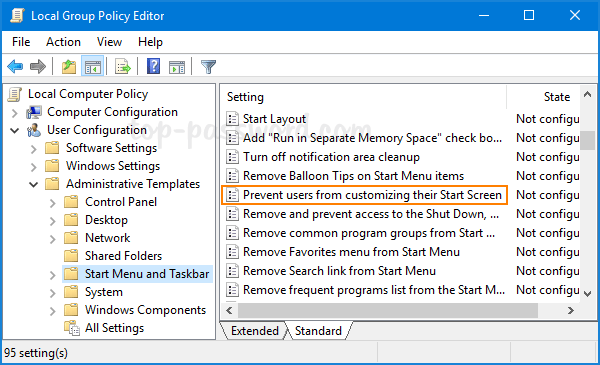
  1. Open the Local Group Policy Editor and go to: User Configuration -> Administrative Templates -> Start Menu and Taskbar. On the right-pane, double-click on the “Prevent users from customizing their Start Screen” policy to edit it.

  2. Select the Enabled radio button and click on Apply.

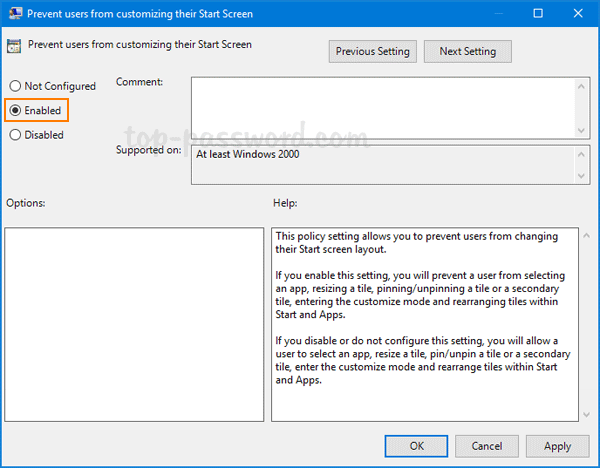
  3. That’s it! Restart the system and now you will be unable to Pin / unpin items to the Start Menu.

Method 2: Using Registry Hack to Lock the Start Menu Layout from Being Changed

  1. Press the Windows key + R to bring up the Run box. Type regedit and press Enter to open the Registry Editor.
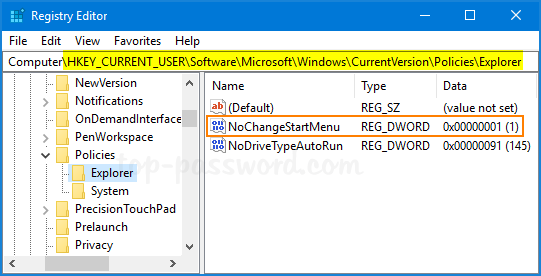
  2. Navigate to the following registry key:
    HKEY_CURRENT_USER\Software\Microsoft\Windows\CurrentVersion\Policies
    In left-side pane, right-click on Policies and select “New -> Key” and give it name Explorer.
  3. Now right-click on the right-side pane, and then create a new 32-bit DWORD and name it NoChangeStartMenu, and set the value to 1.

  4. That’s it. You will need to restart your system for the changes to come into effect. Your current user should be unable to rearrange the Start Menu layout, pin or unpin items to or from Start Menu. This trick also works with Windows 8.1 and Windows 8.

This method will lock the Start Menu layout only for your current user. If you want to lock the layout for all users, just navigate to the registry location: HKEY_LOCAL_MACHINE\Software\Microsoft\Windows\CurrentVersion\Policies, then repeat the same steps above to create a NoChangeStartMenu entry and it will work.

Windows 10 Tip: Switch Between Start Menu and Start Screen

October 18th, 2014 by Admin

With Windows 10 the Start Menu is back. You can expect a unique user interface depending on what you’re running Windows 10 on. On a PC, the Start Menu will be shown by default when you click the Start button in the lower-left corner of your screen, while you’ll get the Start Screen by default on a pure touch-screen device, such as tablet.

Start Screen:
start-screen

Start Menu:
start-menu

Thankfully, Microsoft has made it simple to switch between the Start Menu and the Start Screen. In just a few mouse clicks, you can switch from Start Screen to Start Menu, or from Start Menu to Start Screen. Here’s how.

How to Switch Between Start Menu and Start Screen?

  1. Right-click on the taskbar at the bottom of the screen and choose Properties.

    right-click-taskbar

  2. At the Taskbar and Start Menu properties window, click the Start Menu tab.

    use-start-menu

  3. Check or uncheck the “Use the Start menu instead of the Start screen” option. If it’s checked, Windows 10 will use the Windows 7-style Start Menu. If it’s unchecked, Windows 10 will use the Windows 8-style Start Screen.
  4. Click OK. Log out and then log back into Windows 10. Click the Start button or press the Windows key on your keyboard, it will display the Start Menu or Start Screen as you expected.

How to Customize the Start Menu in Windows 10

October 17th, 2014 by Admin

Windows 10 is basically a combination of Windows 7 and 8 that borrows design elements from each of Microsoft’s two most recent operating systems. If you’re running Windows 10, you may have noticed that the Start Menu is back but it isn’t just the old menu that we have seen in Windows 7 and Vista. The left-hand side of it looks like the Windows 7 Start Menu, with a search bar, links to Documents, Pictures, individual apps, and so on. The right side has all the live tiles and Metro apps. Here’s quick guide to customize it to work the way you want.

start-menu

Remove Live Tiles

Windows 10 Start Menu gets crowded with too many live tiles. If you want to make the Start Menu look more like Windows 7 Start Menu, you can remove all live tiles from it. To remove a live tile, simply right-click on the tile and choose Unpin from Start.

unpin-from-start

Resize Start Menu

Want to make the Start Menu larger or smaller? It’s simple to do. Move your mouse to the top of the menu until the mouse pointer turns into a double-headed arrow. Then drag it in the direction where you want it to grow or shrink. If you just want to resize a live tile, right-click on it and select Resize and then pick a size.

Customize Start Menu

There is a new and dedicated customization menu for the Start menu. To access it, right-click on an empty area of Start Menu and select Properties.

start-menu-properties

In the Taskbar and Start Menu Properties dialog box, select the Start Menu tab, click Customize.

customize-task-start-menu

Now you can choose which folders and locations you want to include and exclude from the Start Menu.

customize-start-menu

Change Start Menu Color

You can change the color of the Start menu easily. Right-click on an empty area of Start Menu and select Personalize. Select a color and apply it. The same color will also be applied to the taskbar and window borders.

set-start-menu-color