Forgot Windows Server admin password for your Dell PowerEdge server? Most of password recovery Live CDs lack the RAID drivers so your hard drive won’t show up after booting. In this tutorial we’ll walk you through the steps of resetting lost admin password on Dell PowerEdge with PCUnlocker Enterprise.
What You’ll Need:
- A USB thumb drive (or a blank CD)
- The ISO image of PCUnlocker Enterprise – You can try the trial version before purchasing the full version
- Dell RAID drivers – Click here to download the RAID drivers for Dell PowerEdge, or check out this article on how to download / extract Dell drivers directly from Dell official website
- A working PC for making the Live CD/USB
Reset Lost Admin Password on Dell PowerEdge with RAID Controller
- Before getting started, use a working PC to download and install ISO2Disc, a free utility that specifically designed to create bootable CD / USB drive from ISO image.
- Launch ISO2Disc and click on Browse button. Select the ISO image of PCUnlocker Enterprise in your PC. Select “Burn to USB Flash Drive” and click on Start Burn.

After the burning is complete, copy the RAID driver files you’ve downloaded and paste them in the root directory of your USB drive.
- Once you have your bootable USB drive, plug it in to a USB port on your Dell PowerEdge server. Power on the server and quickly and repeatedly press the F2 key to enter the BIOS Setup.
- In the BIOS menu, scroll down to the option for “USB Flash Drive Emulation Type“. Use the space bar to change this to “Hard disk“.
- Then go to the Boot Sequence option and press Enter. The USB device will now appear as a hard drive in your boot options. Use the space bar to enable or disable boot options and the + or – keys to change their order in the boot sequence.
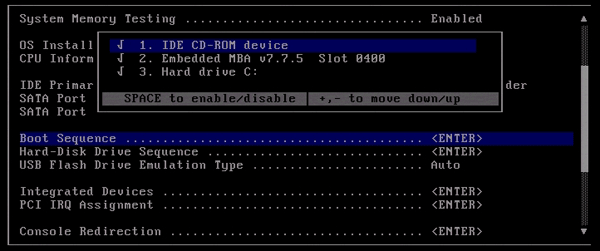
- After making these changes in your BIOS settings, press ESC and choose “Save and Exit“. Your server will reboot from your USB drive.
- Wait for the PCUnlocker program to launch. The program might prompt you to select the SAM file because it can’t recognize your hard drive. So you have to load the RAID driver on the fly. Click on the Options button at the bottom of the screen, and then select “Load IDE/SCSI/SATA/RAID Driver“.
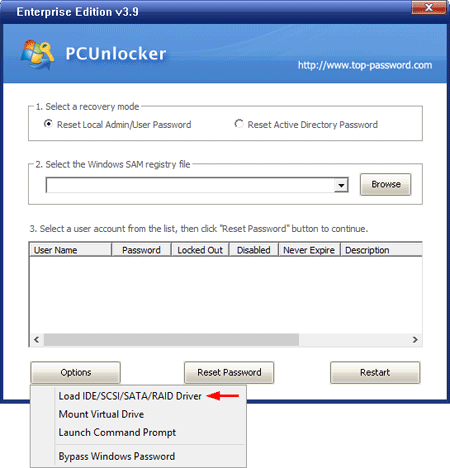
- When the file open dialog appears, choose the RAID driver setup .inf file stored on your USB drive. Click Open.

- Once the driver is loaded successfully, you’ll see a list of user accounts stored in the Windows SAM file. Choose the administrator account and click on Reset Password button to remove the password.

- Reboot your server and unplug the USB thumb drive, you can then log back in to your Windows Server admin account without password. Done!