As you likely know, there are many freewares (for example, ISO2Disc and Rufus) that allow to create a bootable CD or USB stick from WinPE ISO image. However, these tools don’t support USB hard drive as it is not recognized as removable media in Windows. So here I’m going to explain how to manually install WinPE to a portable hard drive.
What You Will Need:
- WinPE ISO image
- A portable hard drive
- Freeware 7-Zip and bootsect_x86
How to Install WinPE to Portable Hard Drive?
This procedure will erase all data on your portable hard drive. Make sure you backup all files on your portable hard drive before following the steps below.
Part 1: Prepare the Partition for WinPE
- Open an elevated command prompt and type diskpart and hit Enter.
- Next type list disk. This will show a list of hard drives currently plugged into your PC. Note the disk number, of the portable hard drive you want to install WinPE to.
- Type select disk x, replacing the x with the disk number of your portable hard drive.
- Type clean to wipe the disk.
- Type create partition primary to create a single primary partition.
- Next type the following commands to format the newly created partition and set it as active, hit Enter after each one.
select partition 1

active

format quick fs=fat32

assign

exit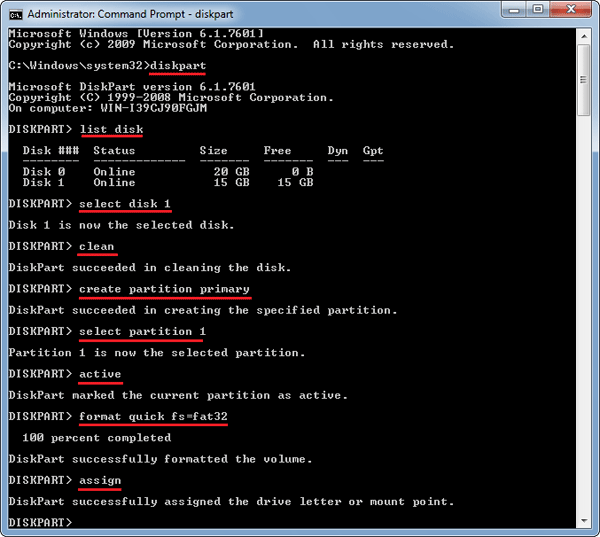
Part 2: Copy WinPE to Portable Hard Drive
Once the portable hard drive has been prepared, you can now use a free utility like 7-Zip to extract your WinPE ISO directly to the drive, by following these steps:
- Right-click on your WinPE ISO image (here we’ll use pcunlocker.iso which is a CD image based on Windows 8.1 PE), and then select “7-Zip” -> “Extract files”.
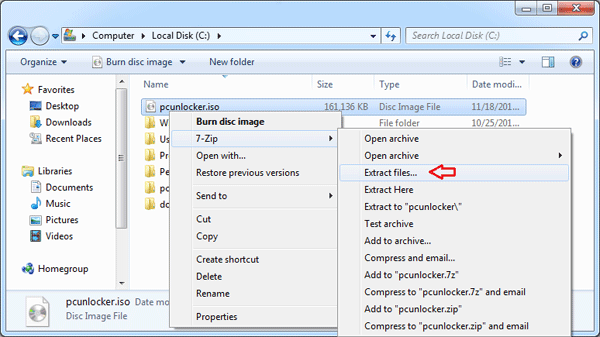
- When the Extract dialog box appears, click on … button to select the root path of your portable hard drive. Click OK.
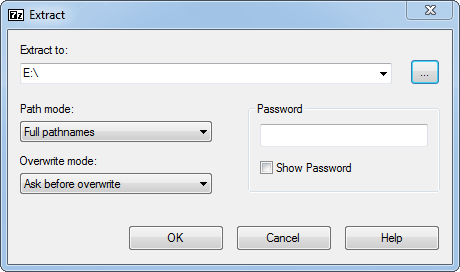
- This will copy the contents of the WinPE ISO image to your portable hard drive.
Part 3: Make Portable Hard Drive Bootable
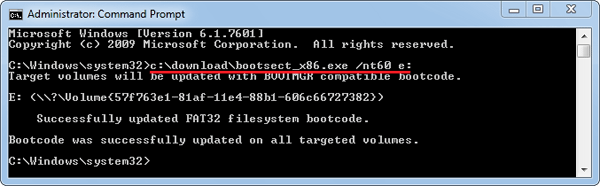
The last but not the least, we need to use the bootsect_x86 utility to make the portable hard drive bootable.
- Open an elevated command prompt
- Type c:\download\bootsect_x86.exe /nt60 e: and press Enter. Here assume you’ve download and saved the bootsect_x86.exe file to c:\download. You also need to replace e: with the drive letter of your portable hard drive.
Conclusion
After successfully installing WinPE to your portable hard drive, you should be able to use it to boot a PC. BTW. This process will also work when installing a Windows setup ISO image (Windows 10, 8, 7 and Windows Server 2012/2008) to external or portable USB hard drive.