Archive for January, 2017

How to Add Email Account to Windows 10 Mail App

January 9th, 2017 by Admin

Windows 10 comes with a built-in Mail app (known as Mail and Calendar). The mail client supports all popular mail services, including Outlook, Exchange, Gmail, Yahoo! Mail, iCloud and other POP/IMAP account. In this tutorial we’ll show you how to set up an email account in Windows 10 Mail app, which makes it easier to keep track of your email.

How to Add Email Account to Windows 10 Mail App?

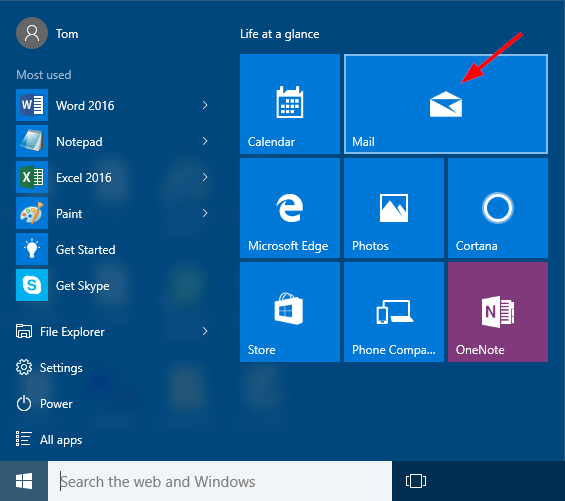
  1. Click the Start button. When the Start Menu appears, click the Mail icon.

    windows-10-mail-app

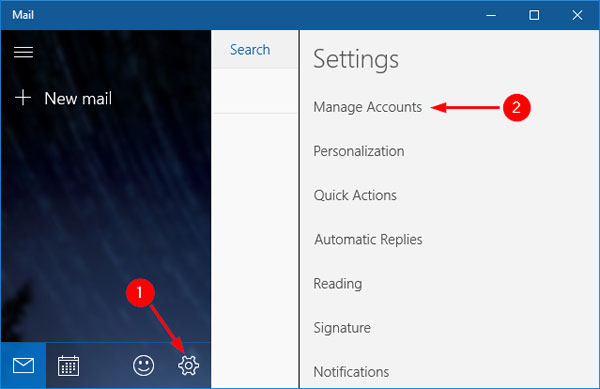
  2. Once you launch the Mail app, click the Settings icon in the lower left-hand corner. Select Manage Accounts from the Settings menu appeared in the right side.

    windows-10-mail

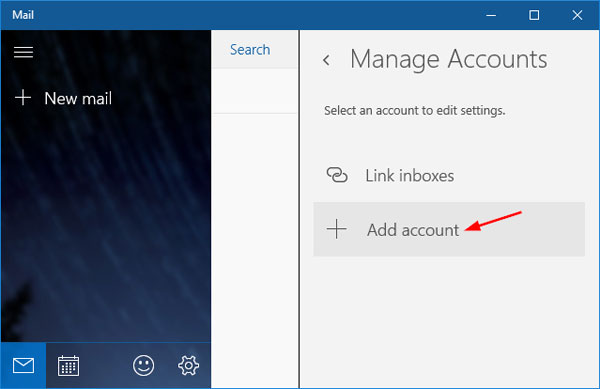
  3. Next click Add account.

    add-mail-account-in-windows-10

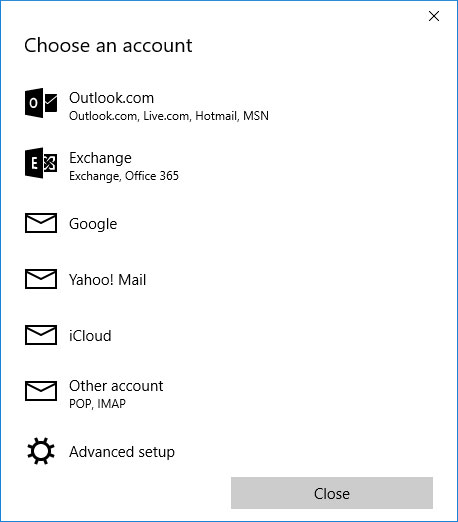
  4. When the “Choose an account” window appears, choose the type of email account you want to add. For example, click Yahoo! Mail option if you want to add a Yahoo! mail account.

    choose-an-account-in-mail

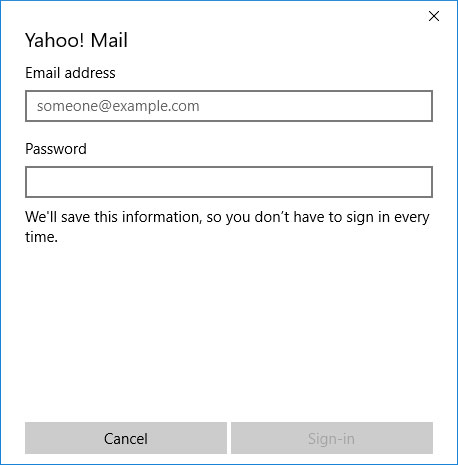
  5. Simply enter your email address and password if prompted. Click Sign-in. This sign-in procedure is different based on the type of email account you chose in the previous step.

    type-mail-address-and-password

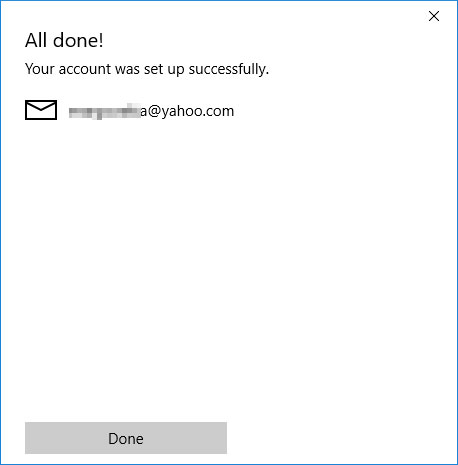
  6. Once the setup procedure is complete, you’ll see the All Done message. Now you can send and receive email from within Windows 10 Mail app.

    set-up-mail-account-done

How to Show Previous Logon Activity on Windows Welcome Screen

January 5th, 2017 by Admin

How to view users logon activity in Windows? Do you need to know the time of the last login? In this tutorial we’ll show you how to deploy a GPO in Windows to display information about previous logons during user logon. This feature works on all computers running Windows 10/8/7, Windows Server2008 or later.

Method 1: Show Previous Logon Information with Group Policy Editor

  1. Press the Windows key + R to open the Run command box. Type gpedit.msc and press Enter.

    gpedit

  2. In the Local Group Policy Editor, drill down to Computer Configuration > Administrative Templates > Windows Components > Windows Logon Options.

    windows-logon-options

    On the right panel, find the “Display information about previous logons during user logon” policy and double-click it.

  3. Select the Enabled option. Click OK and restart your computer.
    display-previous-logon-in-windows

  4. The next time you log into Windows, after entering your password, you will see the following screen that shows you the time of last successful logon and unsuccessful logon attempts. Click OK and it takes you to the desktop.

    windows-previous-login-activity

Method 2: Show Previous Logon Information with Registry Hack

If you have a Windows Home edition, you need to use the following registry hack to enable the “Display information about previous logons during user logon” policy on your computer.

  1. Press the Windows key + R to open the Run box. Type regedit and press Enter.

    regedit-via-run

  2. When the Registry Editor opens, navigate to the following key:
    HKEY_LOCAL_MACHINE\SOFTWARE\Microsoft\Windows\CurrentVersion\Policies\System
  3. Look for the REG_DWORD value DisplayLastLogonInfo in the right panel. If it doesn’t exist, right-click the empty space and choose New > DWORD (32-bit) Value. Name the new value DisplayLastLogonInfo.
  4. Double-click DisplayLastLogonInfo and then change the value from 0 to 1. Click OK. (If you don’t want Windows to show previous logon information after sign-in, just change the DisplayLastLogonInfo value back to 0)

    DisplayLastLogonInfo

  5. Close Registry Editor and restart your computer. The next time you log into your Windows account it will display last interactive logon information on the welcome screen.

Windows 10: Change Default Location Where New Apps will Install

January 3rd, 2017 by Admin

When you download an app from Windows Store, it just downloads the app without asking where you want to install it. By default, Windows 10 stores all apps in C:\Users\user_name\AppData\Local\Packages. If you find yourself always on the verge of running out of disk space on system(C:), you can change the default location where Windows 10 saves and installs new apps.

How to Change Default Location Where New Apps will Install?

  1. Open the Settings app. You can either click the Settings icon from Windows 10 Start Menu, or press the Windows key + I keyboard shortcut.

    open-settings-app

  2. Click on the System option.

    system-settings

  3. On the left-side, click Storage. On the right side under Save locations, select the drive you want New apps will save to and click Apply.

    new-apps-save-location

  4. Close the Settings app and restart your system. Now whenever you install a new app from Windows 10 Store, it will be installed in a newly-created folder named “WindowsApps” under the root path of your new default location.