Posts Tagged ‘fast user switching’

Enable / Disable Fast User Switching in Windows 11, 10, 8, 7 and Vista

January 28th, 2016 by Admin

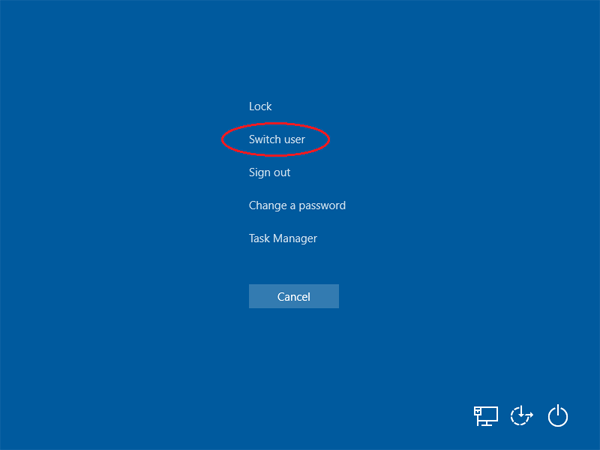
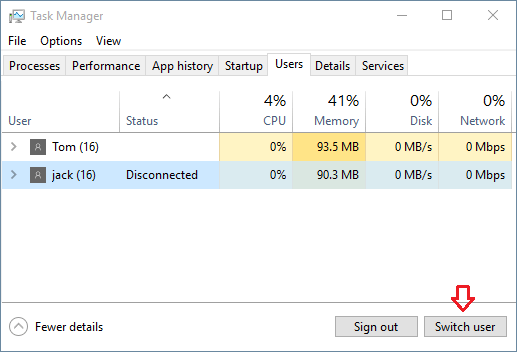
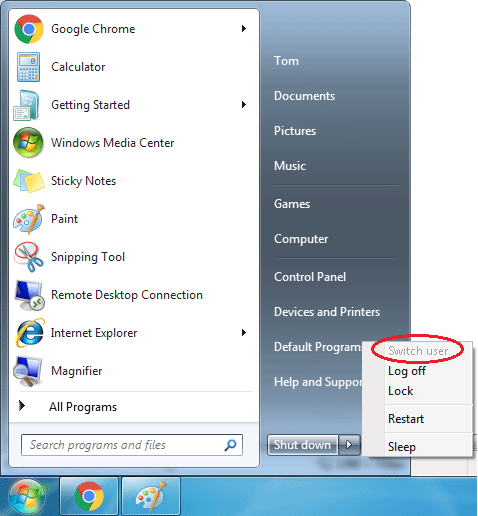
Fast user switching is disabled or missing on your Windows 10 system? Unable to switch to a different account as the “Switch user” option is greyed out?

win7-switch-user

In this tutorial we’ll show you 2 ways to enable or disable Fast User Switching in Windows 11, 10, 8, 7 and Vista.

Method 1: Using Local Group Policy Editor

  1. Press the Windows key + R to open the Run dialog box. Type gpedit.msc and press Enter.
  2. The Local Group Policy Editor console should open. In the left pane, expand the following nodes:
    Local Computer Policy\Computer Configuration\Administrative Templates\System\Logon
  3. In right-side pane, double-click on the “Hide entry points for Fast User Switching” policy and its properties screen will open.

    hide-fast-user-switch

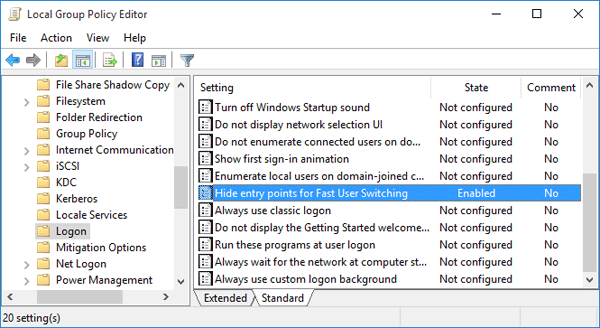
  4. If you want to turn off / disable the Fast User Switching feature, set it to Enabled. Or click Disabled or “Not configured” to re-enable Fast User Switching.

By disabling the Fast User Switching feature, the “Switch user” option will be greyed out or removed from Windows logon screen,Start menu and the Task Manager.

Method 2: Using Registry Trick

Since Group Policy Editor doesn’t come with the Home and Starter editions of Windows, here is another method to enable / disable Fast User Switching using Registry Editor:

  1. Press the Windows key + R to open the Run dialog box. Type regedit and press Enter.
  2. In the Registry Editor window, navigate to the following key:
    HKEY_LOCAL_MACHINE\SOFTWARE\Microsoft\Windows\CurrentVersion\Policies\System
  3. In the right-side pane, search for the value named HideFastUserSwitching. If it doesn’t exist, you can create one by right-clicking in the empty space on the right pane and choose New –> DWORD (32-bit) Value.

    hide-fast-user-switching

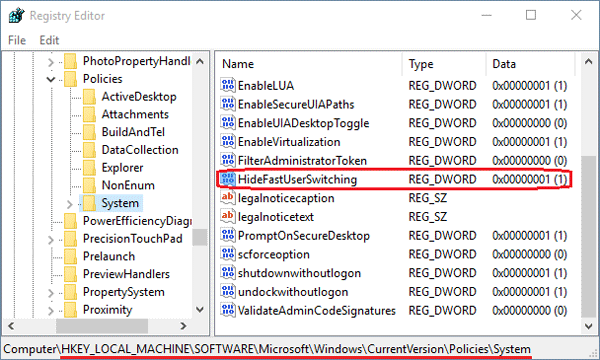
  4. Set the Value data for HideFastUserSwitching to 1 if you want to disable the Fast User Switching feature. To re-enable it, change that value to 0.
  5. Close the Registry Editor. You will have to log off and then log back on for the changes to take effect.

5 Ways to Switch Users in Windows 10 without Log off

January 27th, 2016 by Admin

Fast User Switching is a nice feature for Windows users to quickly switch to another user account, without having to log off or close all running programs of the currently logged-on user. In this tutorial we’ll show you 5 quick ways to switch between multiple user accounts in Windows 10.

Note: Don’t restart or shutdown your computer while another user account is still logged in, or that account will lose any work that isn’t saved.

Option 1: Switch Users from Start Menu

  1. Click the Start button.
  2. From top-left corner of the Start Menu, click your user account who is currently logged in. You’ll see a drop-down menu that lists all other user accounts available in your system.

    win10-switch-user

  3. click on the user account you want to switch to. You will now be taken directly to the sign-in screen of the selected account.
  4. Enter your password and you can log on. Use the same method and you can switch back to your original account.

Option 2: Switch Users from Lock Screen (Windows + L)

  1. Press the Windows key + L simultaneously (i.e. hold down the Windows key and tap L) on your keyboard and it will lock your computer.
  2. Click the lock screen and you’ll be back on the sign-in screen. Select and log in to the account you want to switch to.

    windows-L

Option 3: Switch Users by Pressing Alt + F4

  1. The Alt + F4 keyboard shortcut has been around about as long as Windows has, as a shortcut to close the window that’s in focus. If your desktop has the focus, then pressing Alt + F4 will bring up the Shut Down Windows dialog. If the focus is not in your desktop, press the Windows key + D to hide all programs or click your desktop background.
  2. Select Switch user from the drop-down menu, and click/tap on OK or press Enter.

    alt-f4

  3. You will now be taken to the lock screen to unlock. When you’re back at the sign-in screen, you can select and sign in to the account you want to switch to.

Option 4: Switch Users by Pressing Ctrl + Alt + Del

  1. Press Ctrl + Alt + Del at the same time to open the security screen.
  2. Click on Switch user. You will now be taken directly to the sign-in screen to select and sign in to the account you want to switch to.

    ctrl-alt-del

Option 5: Switch Users from Task Manager

  1. Open the Task Manager in Windows 10. You can launch it by right-clicking the taskbar and then selecting “Task Manager“, or pressing the Ctrl + Shift + Esc keyboard combination.
  2. By default, the Task Manager will open in compact view. Click the “More Details” button at the bottom to access the full Task Manager.
  3. Click on the Users tab, select a user that you want to switch to, and click on the “Switch user” button.

    task-manager

  4. You can then switch and sign in to your selected account.