How can I turn off camera on my laptop? Look for a way to prevent a specific app from accessing your camera? Nowadays many laptops and tablets have integrated cameras that could be used as a webcam to video chat. But some users might want to turn them off because of security concerns. In this tutorial we’ll show you 2 methods to enable / disable Camera (or Webcam) in Windows 10.
Method 1: Enable / Disable Camera Using Windows 10 Settings
- Open the Settings app by pressing the Windows + I shortcut key, or clicking the Settings icon from the Start Menu in Windows 10.

- From the Settings window, click Privacy.
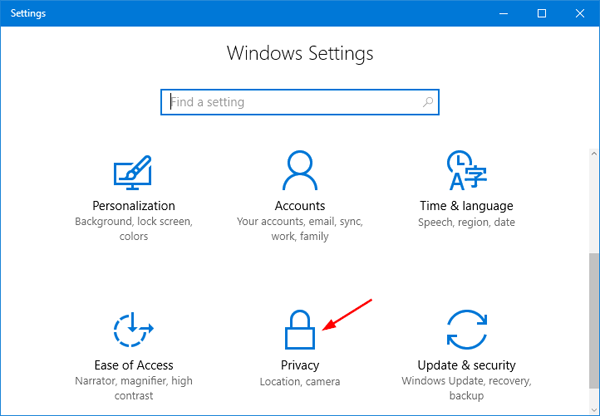
- Choose Camera in the left pane. You’ll see an option that says “Let apps use my camera“. Slide the toggle to On and select which of the apps underneath can use your camera, or toggle Off to prevent all apps from accessing your camera.

Method 2: Enable / Disable Camera Using Device Manager
If you want to completely disable your camera in Windows 10, just follow these steps:
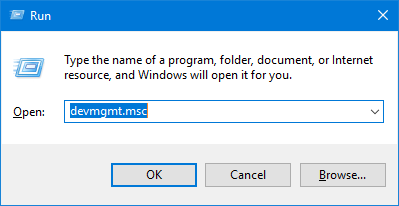
- Press the Windows + R keys together to open the Run box. Type devmgmt.msc and press Enter.
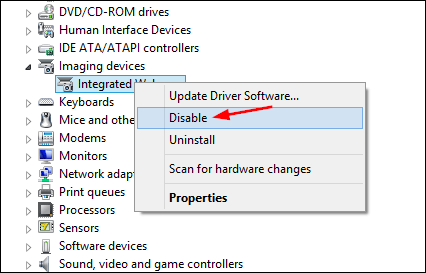
- Once the Device Manager window opens, expand Imaging devices (or Integrated Camera) to display your camera. Just right click on it and select Disable. You may be asked for confirmation. Select Yes.
- Your camera will now be turned off. If you ever need to use the webcam, repeat the above process, but select Enable when right-clicking on your camera.