After turning on BitLocker to encrypt your hard drive, it’s important to save a copy of the BitLocker recovery key in case you need it. If you’ve lost the recovery key created when you initially set up BitLocker, you can make a new copy of the key as long as you can sign into Windows 10. This tutorial explains 3 simple ways to backup the BitLocker recovery key on Windows 10.
Method 1: Backup BitLocker Recovery Key Using Control Panel
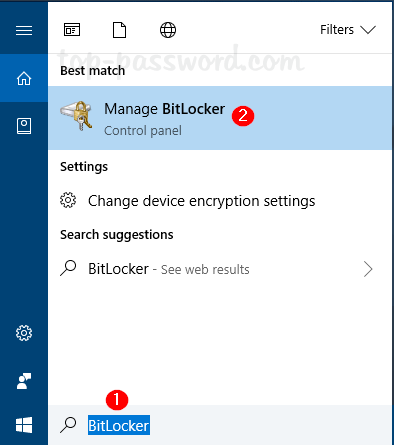
- To start, type BitLocker in the Cortana search box on the taskbar, and then click Manage BitLocker from the result to open the BitLocker Drive Encryption control panel.
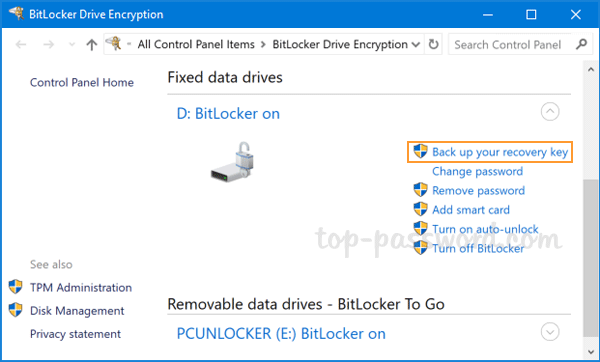
- Click on the link stating “Back up your recovery key” next to the encrypted drive.
- It will prompt you to choose how to store the recovery key. You can save the key on a USB drive, a file on unencrypted drive or print it out.
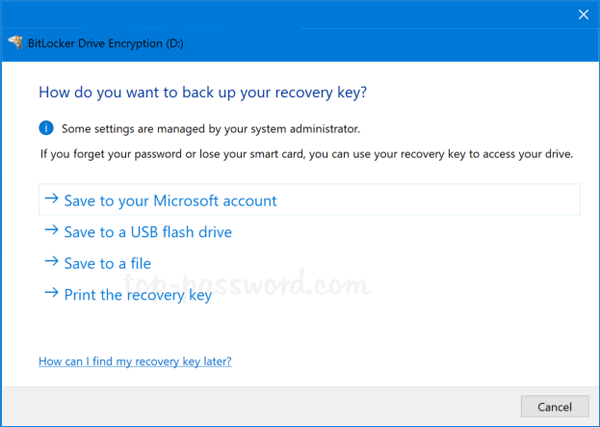
But I would recommend you save the key to your online Microsoft account, so you can retrieve it from any computer by signing into this page: onedrive.com/recoverykey.
Method 2: Backup BitLocker Recovery Key Using Command Prompt
- Open the Command Prompt as administrator, and run the following command and press Enter. Replacing C: with the letter of your BitLocker-encrypted drive.
manage-bde -protectors C: -get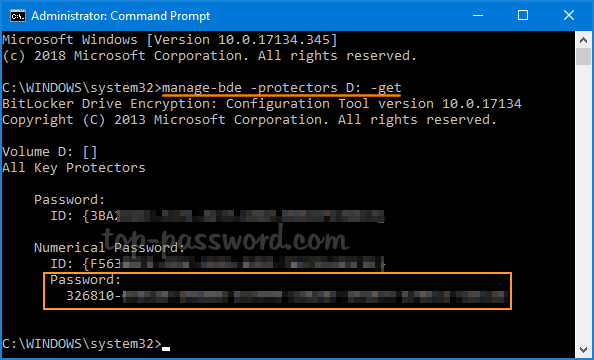
- You can find a 48 digit recovery key at the end. Note it down on a piece of paper or save it to somewhere secure and accessible.
Method 3: Backup BitLocker Recovery Keys for All Drives Using PowerShell
This method works by creating a PowerShell script, so you can backup BitLocker recovery keys for all drives at once. Follow these steps:
- Open Notepad and paste the following script in it. Save the file with the .ps1 extension.
# Export the BitLocker recovery keys for all drives and display them at the Command Prompt.

$BitlockerVolumers = Get-BitLockerVolume

$BitlockerVolumers |

    ForEach-Object {

        $MountPoint = $_.MountPoint

        $RecoveryKey = [string]($_.KeyProtector).RecoveryPassword

        if ($RecoveryKey.Length -gt 5) {

            Write-Output ("The drive $MountPoint has a BitLocker recovery key $RecoveryKey.")

        }

} - Right-click on the Start button and then select “Windows PowerShell (Admin)” from the WinX Menu.

- From the PowerShell console, you can execute the .ps1 script you’ve created previously.

The screen will display the recovery keys for every BitLocker drive found on your computer. If you’re restricted from running PowerShell script, you may have to adjust the PowerShell execution policy.
That’s it! Whenever your computer won’t start or you can’t sign into your Windows account, you can still access your files by decrypting the encrypted drive with your BitLocker recovery key.