Archive for October, 2014

Windows 10 Tip: Switch Between Start Menu and Start Screen

October 18th, 2014 by Admin

With Windows 10 the Start Menu is back. You can expect a unique user interface depending on what you’re running Windows 10 on. On a PC, the Start Menu will be shown by default when you click the Start button in the lower-left corner of your screen, while you’ll get the Start Screen by default on a pure touch-screen device, such as tablet.

Start Screen:
start-screen

Start Menu:
start-menu

Thankfully, Microsoft has made it simple to switch between the Start Menu and the Start Screen. In just a few mouse clicks, you can switch from Start Screen to Start Menu, or from Start Menu to Start Screen. Here’s how.

How to Switch Between Start Menu and Start Screen?

  1. Right-click on the taskbar at the bottom of the screen and choose Properties.

    right-click-taskbar

  2. At the Taskbar and Start Menu properties window, click the Start Menu tab.

    use-start-menu

  3. Check or uncheck the “Use the Start menu instead of the Start screen” option. If it’s checked, Windows 10 will use the Windows 7-style Start Menu. If it’s unchecked, Windows 10 will use the Windows 8-style Start Screen.
  4. Click OK. Log out and then log back into Windows 10. Click the Start button or press the Windows key on your keyboard, it will display the Start Menu or Start Screen as you expected.

How to Customize the Start Menu in Windows 10

October 17th, 2014 by Admin

Windows 10 is basically a combination of Windows 7 and 8 that borrows design elements from each of Microsoft’s two most recent operating systems. If you’re running Windows 10, you may have noticed that the Start Menu is back but it isn’t just the old menu that we have seen in Windows 7 and Vista. The left-hand side of it looks like the Windows 7 Start Menu, with a search bar, links to Documents, Pictures, individual apps, and so on. The right side has all the live tiles and Metro apps. Here’s quick guide to customize it to work the way you want.

start-menu

Remove Live Tiles

Windows 10 Start Menu gets crowded with too many live tiles. If you want to make the Start Menu look more like Windows 7 Start Menu, you can remove all live tiles from it. To remove a live tile, simply right-click on the tile and choose Unpin from Start.

unpin-from-start

Resize Start Menu

Want to make the Start Menu larger or smaller? It’s simple to do. Move your mouse to the top of the menu until the mouse pointer turns into a double-headed arrow. Then drag it in the direction where you want it to grow or shrink. If you just want to resize a live tile, right-click on it and select Resize and then pick a size.

Customize Start Menu

There is a new and dedicated customization menu for the Start menu. To access it, right-click on an empty area of Start Menu and select Properties.

start-menu-properties

In the Taskbar and Start Menu Properties dialog box, select the Start Menu tab, click Customize.

customize-task-start-menu

Now you can choose which folders and locations you want to include and exclude from the Start Menu.

customize-start-menu

Change Start Menu Color

You can change the color of the Start menu easily. Right-click on an empty area of Start Menu and select Personalize. Select a color and apply it. The same color will also be applied to the taskbar and window borders.

set-start-menu-color

How to Crack Windows 8.1 Password with A Bootdisk

October 13th, 2014 by Admin

How to unlock your computer after you’ve forgotten Windows 8.1 password? PCUnlocker is a powerful bootdisk that allows you to crack Windows 8.1 password on a computer where you forgot your password. The step-by-step guide below should work for Windows 8, Windows 8.1 and earlier versions of Windows.

How to Crack Windows 8.1 Password with A Bootdisk?

After you download PCUnlocker, you have to burn it on a CD by right-clicking the ISO file. If you don’t have an optical drive and you want to boot from a USB flash drive, you can use the free tool ISO2Disc.
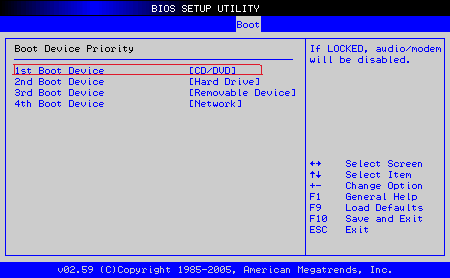
Next, you have to ensure that the CD or USB flash drive comes before the hard drive in the boot order of your BIOS settings. Most PCs allow you to access the PC setup by pressing F2, F12 or Del right after you turn the PC on. If your computer comes with UEFI firmware, you might also need to set your PC to boot with Legacy BIOS mode instead of UEFI mode.

After you boot PCUnlocker, you should see the following screen. If you have more than one Windows installation on the computer, be sure to choose the correct SAM registry file for your target Windows installation.

Choose the user account where you want to reset the password, click on Reset Password button. This program will remove the existing login password and unlock your account in case it was locked out or disabled.

The password cracking process is now completed. Reboot your computer and take out the CD or USB flash drive. You can then login to Windows 8.1 without the need of a password!

How to Recover Firefox Saved Passwords from Logins.json

October 7th, 2014 by Admin

Since Firefox 32.0, the built-in password manager changes to store the website passwords in a file named logins.json instead of signons.sqlite. The signons.sqlite is still out there but it’s no longer used. Now we’ve added support for Firefox 32 and you can use the latest version v1.9 of our Firefox Password Recovery program to recover Firefox saved passwords from logins.json.

How to Recover Firefox Saved Passwords from Logins.json?

The logins.json file is stored in a seperate place from the Firefox program. Typically, it’s C:\Users\<user_name>\AppData\Roaming\Mozilla\Firefox\Profiles\. Here is how to decrypt and extract the saved passwords from it.

  1. Download and install the Firefox Password Recovery program on your computer.
  2. Launch the program and click on Start Recovery button.
  3. Select Recover Firefox Password from the drop-down menu.
  4. The program will automatically decrypt the logins.json file stored in the Firefox profile folder, and then show you a list of saved login credentials, including URLs, username and passwords.

PCUnlocker: The First Password Cracking Software with Windows 10 Support

October 4th, 2014 by Admin

Just three days ago Microsoft announced Windows 10 Technical Preview, the successor to Windows 8.1. The download is available through the Windows Insider Program website in both 64-bit and 32-bit flavors, weighing in at around 3-4GB for each edition.

Once you’ve signed up for the Windows Insider Program, you can then download the ISO image of Windows 10 Technical Preview for free. For testing purpose, I installed Windows 10 in a VMware virtual machine and then set up both a local account and a Microsoft account as the login methods. The most exciting thing is that PCUnlocker works flawlessly with Windows 10, which can successfully reset both local account password and Microsoft account password without data loss!

And for now, PCUnlocker v3.2 should be the first password cracking software which supports Windows 10 Technical Preview! If you are a registered user of previous versions of PCUnlocker, just tell us your order number and we’ll send you the latest version v3.2 for absolutely FREE!

Have any questions, ideas, suggestions? Do not hesitate to comment here or contact our customer support team.