Archive for the ‘Windows 8’ category

How to Remove Windows 8 Password When You are Locked Out

January 2nd, 2013 by Admin

I got a brand new Windows 8 machine, installed the operating system, created one account and forgot its password. What can I do? I already tried to remember passwords and tried all candidates with all possible combinations but no luck. Is there any way to remove the password without re-installing Windows 8?

Forgot Windows 8 account password and you are locked out of your computer? Getting into a password-protected computer can be a lot easier than you think. You don’t even have to be computer savvy! In this tutorial we’ll show you how to remove Windows 8 password with a CD or USB drive in case you lost or forgot the login password.

How to Remove Windows 8 Password When You are Locked Out?

First, you need an alternative computer with CD burner and a blank CD in order to make a bootable Windows 8 password reset disk. To do that download the Reset Windows Password utility, unzip the download file and you’ll get an ISO image: ResetWindowsPwd.iso. Burn the ISO image to a CD using your favorite CD burning software. If you don’t have a CD burner, let’s say you have a netbook PC, then you can do a Windows 8 password reset USB instead.

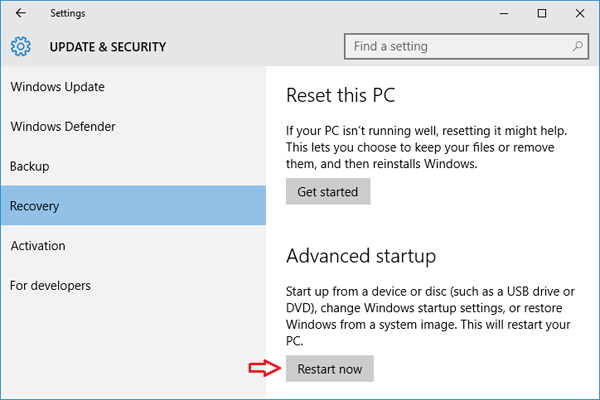
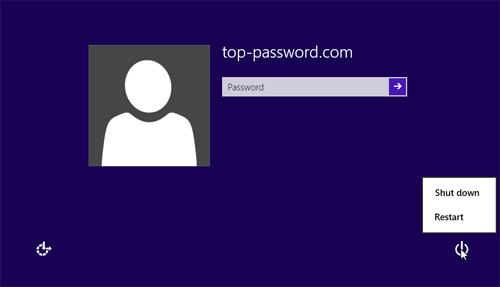
After you have created a bootable Windows 8 password reset disk or USB as mentioned above, go and boot the Windows 8 PC you want to reset its password with this reset disk or USB. Once the PC starts to boot, it will load the operating system inside the password reset disk and launch the Reset Windows Password program.

Choose a user account and then click on Reset Password button. It will remove your forgotten Windows 8 password and unlock the user account immediately.

Now take out the password reset disk and restart the computer. You can then log in to Windows 8 without being asked to enter a password. No need to worry about data loss when you forgot Windows 8 password or you are locked out. Just follow the instructions above carefully you can remove Windows 8 password quickly and easily.

How to Turn Off App Notification in Windows 8

December 31st, 2012 by Admin

Windows 8 displays app notifications in the Metro-style Start Screen for installed apps, Calendar events, new email, and other app events. But you might not be interested in getting notifications for all apps, in such cases you can configure which apps can sent out notifications for you. In this article we’ll show you how to turn off app notifications in Windows 8.

How to Turn Off App Notification in Windows 8?

  1. Access the Charms bar by pressing Windows + C or moving your mouse to the bottom right of the screen and slowly moving the mouse up. When the Charms bar appears, click on the Settings.
  2. Click on More PC Settings link at the bottom of the sidebar.
  3. In the PC Settings screen, navigate to Notifications section in the left pane.
  4. In the right pane, there are ‘Show app notifications’, ‘Show app notifications on the Lock Screen’ and ‘Play notification sounds’ toggles. In order to complete turn off notifications for all apps, just turn off the Show app Notifications option.

  5. Other than turning off notifications for all installed apps, you can do so selectively as well. The lower part of the Notifications settings screen allows you to turn off notifications for individual apps of your choice.

3 Options to Access UEFI BIOS Setup in Windows 8 / 10

December 30th, 2012 by Admin

On Windows 10 or 8 operating systems that came pre-installed on the computer from the factory, the legacy BIOS has been replaced by UEFI (Unified Extensible Firmware Interface). This will cause the problem that bootable media from previous versions of Windows may not be recognized in Windows 10 / 8 computer. To resolve this problem, you need to switch your BIOS mode from UEFI BIOS to Legacy BIOS. No doing so would prevent the installation of Linux, Windows 7, or any other OS.

In this tutorial we’ll show you 3 ways to access UEFI BIOS Setup, even if you couldn’t login to Windows 10 or 8.

Option 1: Access UEFI BIOS Setup After Logging in to Windows 10/8

In previous post, we’ve covered how to set Windows 8 PC to boot with legacy BIOS mode instead of UEFI mode. Here we’ll show you another option to access UEFI BIOS Setup so long as you can log into Windows 10 / 8. Here are the steps:

  1. In Windows 8/8.1, press the Windows key + C, or swipe in from the right edge of the screen to open your Charms. Click Settings -> Change PC Settings. In PC Settings, select General.

    If you’re running Windows 10, press the Windows key + I to open the Settings app. Click Update & Security. Select the Recovery tab on the left pane.

    update-security

  2. Under Advanced startup, click Restart now. The system will restart and show the boot menu.
  3. In the boot menu, select Troubleshoot.

  4. In the Troubleshoot menu, select Advanced options.

  5. In the Advanced options menu, select UEFI Firmware Settings.

  6. Click Restart button to boot into UEFI BIOS Setup screen.

  7. When the computer restarts, the UEFI setup screen will be displayed. You can then disable UEFI BIOS and Secure Boot options, and enable legacy BIOS mode.

Option 2: Access UEFI BIOS Setup without Logging in to Windows 10/8

What to do if you forgot Windows user password and can’t login? Here is how you can access the UEFI BIOS Setup from Windows 10/8 login screen:

  1. From the login screen, click the Power icon in the lower right corner of the screen. While holding the Shift key, select Restart.

  2. The system will not actually restart but go into the boot options. click Troubleshoot.

  3. Afterwards, click Advanced options -> UEFI Firmware Settings -> Restart.
  4. The computer will reboot and take you into the UEFI BIOS setup.

Option 3: Access UEFI BIOS Setup from Command Prompt

You can also boot your computer into UEFI BIOS Setup by executing a simple command at the Command Prompt. Follow these steps:

  1. Open the elevated Command Prompt, then run the following command:
    shutdown /r /fw

  2. You’ll get a popup that says Windows is about to sign you out. Click Close.

  3. Your PC will now restart directly to UEFI settings.

How to Set Windows 10 / 8 PC to Boot with Legacy BIOS Mode Instead of UEFI Mode

December 29th, 2012 by Admin

Just got a new DELL laptop with Windows 8 pre-installed but it refused to boot from Ubuntu Live CD or even Windows 7 installation DVD? If you’re in similar situation, you should see the error message “Reboot and Select proper Boot device” or “No bootable device found” on the screen during boot. In order to fix this issue, all you need to do is to disable the UEFI mode and turn off the Secure Boot option in BIOS, which allows the EFI-based PC to operate in a legacy BIOS mode. Fortunately, nearly all modern EFI-based computers include a feature known as the Compatibility Support Module (CSM) that enables them to boot with legacy BIOS mode.

One of Microsoft’s new rules for Windows 10/8 is that any manufacturer that ships a windows 10/8 computer must enable UEFI secure boot by default. The UEFI BIOS is created for Windows 10/8 and if you need to use other system like Windows 7, Linux or any other OS, you have to disable the UEFI mode and Secure Boot options.

How to Set Windows 10 / 8 PC to Boot with Legacy BIOS Mode Instead of UEFI Mode?

When your computer is powered on, check the boot-screen for setup key (i.e. DELETE key, F8 key, F2 key) to enter BIOS Setup Utility. If you don’t know how to access your BIOS (UEFI) Setup, please check out this article: How to Set Your Computer to Boot from CD or USB Drive.

In the BIOS Setup Utility, change the boot mode from UEFI mode to legacy BIOS mode (or CSM boot mode), and disable the Secure Boot option. Here are steps of disabling UEFI secure boot in Toshiba laptop:

  1. Power on the system and while the “TOSHIBA” logo appears, press F2 key to enter the BIOS Setup Menu.
  2. Select Security tab and set the Secure Boot to Disabled.
  3. Select Advanced tab and go to System Configuration.
  4. Set the Boot Mode to CSM Boot.
  5. Press F10 key to save and exit.
  6. Press F12 key at “TOSHIBA” logo screen to toggle between the bootable devices and choose the medium which you want to boot from.

Note: Once you are finished and you want to return back to normal operation you need to revert the BIOS settings. The installed Windows 10/8 OS will not boot up, if you do not revert the BIOS settings!

The exact menu option in your motherboard’s BIOS may differ but look for phrases like “Boot Mode”, “Boot List Option”, “UEFI/Legacy Boot Priority”, “UEFI Boot”, etc. For example, in ASUS desktop or laptop computers, you need to enable the “Launch CSM” option and disable the “Secure Boot Control” or “Fast Boot” option.

hp-secure-boot

dell-latitude-uefi

hp-envy-uefi

samsung-uefi-secure-boot

What to Do If You Forgot Windows 8 Picture Password

December 27th, 2012 by Admin

For Windows 8 users on a tablet or touchscreen computer, picture password is a great way to secure your computer without having to break out the keyboard every time you want to log in. By having the system memorize a few gestures over a picture, you can log in a lot faster and more efficiently than you could otherwise. But it may also cause you trouble if you forgot your picture password.

What to do if you forgot Windows 8 picture password? There are plenty of password cracking software which are available on the internet free of charge, but none of them support the recovery of picture password. In this tutorial we’ll show you how to log on back to your computer when you forgot Windows 8 picture password.

After forgetting your picture password, you can always choose to login using some other sign-in options such as traditional text password or Windows Live ID. Once you’ve gotten into Windows 8, you can reset or change your picture password easily. Now you may continue to ask what to do if both the text password and Windows Live password are also lost or forgotten? Luckily there is a professional password recovery utility – Password Recovery Bundle, which allows you to reset forgotten Windows 8 local account password and Microsoft account password easily.

The first thing you’ll need to do is use your friend’s computer to download and install Password Recovery Bundle. The software allows you to create a bootable Windows password reset CD/USB. After creating such a disc, bring it to boot your locked Windows 8 system. The computer will load the mini operating system inside the disc and start the Reset Windows Password program. Choose your administrator account and click on Reset Password button, it will remove your login password immediately.

Next restart the computer and remove the password reset CD/USB, you can then sign in to Windows 8 local account or Microsoft account using a blank password. Once you’re in Windows 8 with administrator privileges, you are granted to remove/change/reset your forgotten picture password easily.

How to Run an Application as Administrator in Windows 8

December 26th, 2012 by Admin

In the previous post, we’ve covered several methods to run a program with administrator rights on Windows 7/Vista/XP. The methods still work on Windows 8. This tutorial will show you some other options to run an application as administrator with full unrestricted elevated rights and privileges in Windows 8.

Option 1: Run an Application as Administrator from Start Screen

  1. Move the mouse cursor to the bottom right corner of the screen, click the Search icon.
  2. Type the program’s name that you want to run as administrator in the Search box.
  3. Right-click on your desired application on the top-left of the search result page. A tick sign appears on the icon.
  4. Click on the Run as Administrator icon from the bottom options.

Option 2: Run an Application as Administrator from Task Manager

  1. Simply hit Ctrl + Shift + Esc on your keyboard (that starts the Task Manager) and then click on File -> New Task.
  2. A new dialog box will open. Type the name of your desired program, check the Create this task with administrative privileges box, and click OK.

Note: If you forgot the password for your administrator account in Windows 8, you can use the Reset Windows Password bootdisk to remove your password quickly and easily.

Forgot Windows 8 Password for Your Laptop?

December 23rd, 2012 by Admin

I have tried everything to get into my Windows 8 laptop. The password I had set up will not work for some reason. Is there anyway I can bypass this and get into my laptop.

Forgot Windows 8 password for your laptop? It is troublesome when you forgot windows 8 password especially your system contains important data. Though re-installing Windows 8 will help you remove Windows 8 password, it also erase your important data on computer. Many computer newbies don’t have any idea about password reset disc and other methods to reset the password in Windows 8. Here I’ll show you the easiest way to reset Windows 8 password using a bootable password reset disc.

How to Reset Forgotten Windows 8 Password for Your Laptop?

Reset Windows Password utility is one of the best Windows password recovery software which can help you unlock administrator password easily on Windows 8, 7, Vista, XP.

You have to boot into this program off a CD or USB drive, so it downloads as an .iso image file. Double-click that file and Windows just might start a program that burns the disc. If it doesn’t, download and install ISO2Disc, then try again. Simply copying the .iso file to a CD won’t work.

When you boot the Windows password reset disc, the computer will load the mini operating system inside the disc and finally start the Reset Windows Password program. The program automatically finds the Windows SAM database and retrieves the user accounts existing in your Windows 8 installation.

Simply select the user account whose password you want to reset, then click on Reset Password button. It will delete the forgotten/unknown password in no time.

Finally remove the CD and reboot the computer. It will boot Windows into the logon screen. Choose your user account and left the password field as blank, you can log in to Windows 8 without any hassle.

How to Unlock Windows Administrator Password

December 8th, 2012 by Admin

Maybe you use your administrator-level Windows user account so rarely that you forgot the password. Or perhaps you’ve acquired a used PC, don’t know the login password. Either way, if you want to keep using that computer, you have to either find out how to unlock the forgotten administrator password or reformat the hard drive.

In this tutorial we’ll show you how to unlock Windows administrator password when you forgot it. Quickly get into your computer without losing your files. You can use this trick on Windows 8, 7, Vista and XP.

How to Unlock Windows Administrator Password?

Reset Windows Password utility is one of the best Windows password recovery software which can help you unlock administrator password easily on Windows 8, 7, Vista, XP.

You have to boot into this program off a CD or USB drive, so it downloads as an .iso image file. Double-click that file and Windows just might start a program that burns the disc. If it doesn’t, download and install ISO2Disc, then try again. Simply copying the .iso file to a CD won’t work.

When you boot the Windows password reset disc, the computer will load the mini operating system inside the disc and finally start the Reset Windows Password program. The program automatically finds the Windows SAM database and retrieves the user accounts existing in your Windows installation.

Simply select the administrator account if you forgot the password, then click on Reset Password button. It will unlock your selected account and remove its password in no time.

Finally remove the CD and reboot the computer. It will boot Windows into the logon screen. Choose your administrator account and left the password field as blank, you can login without any hassle.

How to Disable Windows 8 or 10 Lock Screen

December 7th, 2012 by Admin

By default, Windows 8 or 10 shows Lock Screen at startup, which displays the date ad well as notifications. You have to click the screen before you can get to the logon screen. This seems like something that makes more sense on a tablet PC.

windows-lock-screen

If you are using a desktop or laptop computer, you can disable the Lock Screen so the computer will boot up directly to logon screen to choose the user account to log in to Windows 8/10. Fortunately, you can disable the Lock Screen from Local Group Policy Editor or Registry Editor.

Method 1: Disable Windows 8 or 10 Lock Screen Using Group Policy

  1. The first thing you need to do is to open the Local Group Policy Editor by pressing the Windows + R key combination to bring up a Run box, then type gpedit.msc and hit Enter.
  2. Now, expand Administrative Templates settings from Computer Configuration, and then navigate to Control Panel –> Personalization. In main window, you will find Do not display the lock screen policy.

    do-not-display-lock-screen

  3. Double-click this policy and tick Enabled checkbox. This will permanently disable Lock Screen. When disabled, users will see the logon screen when they log off or lock out Windows. Similarly, you will be taken to logon screen directly, instead of Lock Screen, at startup.

Method 2: Disable Windows 8 or 10 Lock Screen Using Registry Editor

  1. Open Registry Editor by pressing Windows key + R to open the Run box, and then type regedit and press Enter.
  2. Navigate to the following registry key:
    HKEY_LOCAL_MACHINE\SOFTWARE\Policies\Microsoft\Windows\Personalization

    If you do not see the Personalization key, you have to create it by right-clicking the Windows key above it and selecting New -> Key.

  3. Right-click in the right pane and create a new DWORD value named NoLockScreen, and then set its value to 1.

    disable-lock-screen

    To re-enable the lock screen in the future, either delete the NoLockScreen value from your registry or set it to 0.

  4. Close the registry editor and now you’ve successfully removed the lock screen.

How to Reset Lost Windows User Password

December 6th, 2012 by Admin

Just a few days ago, I tried to log into a seldom-used Windows XP system, only to have forgotten the administrator password. Since I don’t use that PC often, I wasn’t concerned about losing applications and data. But after spending ten minutes guessing various combinations, I still couldn’t login. Please help!!!

Forgot Windows user password? If you’ve created a password reset disk beforehand, just insert it into the PC and click Reset Password link at the Windows login screen to restore access. However, most average computer users don’t know the importance of creating a password reset disk in case a Windows user password is lost or forgotten.

In this tutorial we’ll show you an easy option to regain access to your lost Windows user account. Reset Windows Password enables you to create a bootable password reset CD which can be used to reset lost Windows user password on nearly all versions of Windows system. Follow the instructions to know how can you unlock Windows user password immediately.

  1. First you need to prepare a password reset boot CD. Just download the Reset Windows Password software onto an alternative computer. Once the download is complete, unzip the download file and you’ll get the ResetWindowsPwd.iso file. Burn this ISO image to a blank CD using any CD recording program such as BurnCDCC.
  2. Once you’ve created the disc, boot your locked computer from the CD. The computer will load the mini operating system inside the boot CD and finally open up Reset Windows Password program.

  3. Choose your Windows SAM registry hive, and then select a user account and click on Reset Password button. The program will remove the forgotten Windows user password instantly.

Restart the PC and take out the boot CD, you can then log in to Windows user account with a blank password. This trick works on Windows 8, 7, Vista, XP and Windows server operating system.