“After I applied the recent updates and reboot my Windows 10 laptop, I noticed that the battery icon at the bottom right of desktop screen disappeared and became apparently inactive. How can I get it back? Please help!”
The battery status icon is very handy for laptop/notebook/tablet users to see how much time is left charging, or remaining percentage of battery life. By default, the battery icon is shown in notification area of the taskbar. If your battery icon is missing or disappeared from Windows 10 taskbar, try the following methods to get it back.
![]()
Method 1: Restore Missing Battery Icon Using Settings
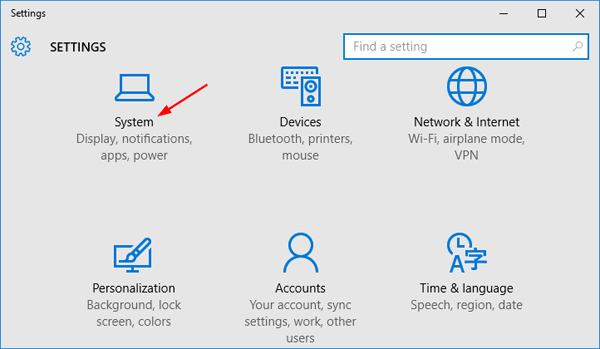
- Open the Settings app either by clicking its icon in the Start Menu or pressing Windows logo key + I keyboard shortcut.
- Click on System.
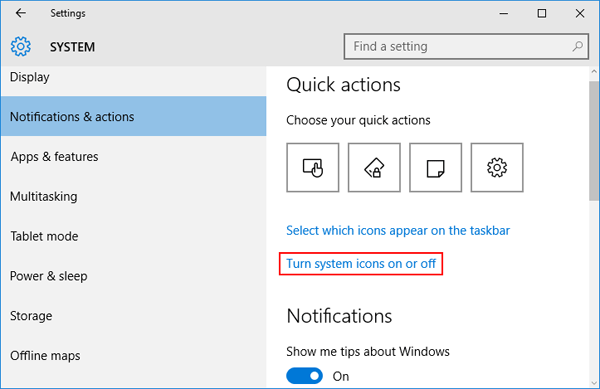
- Select the Notifications & actions tab on the left side, and then click the Turn system icons on or off link on the right pane.
- Just toggle the slider for Power to the On position.

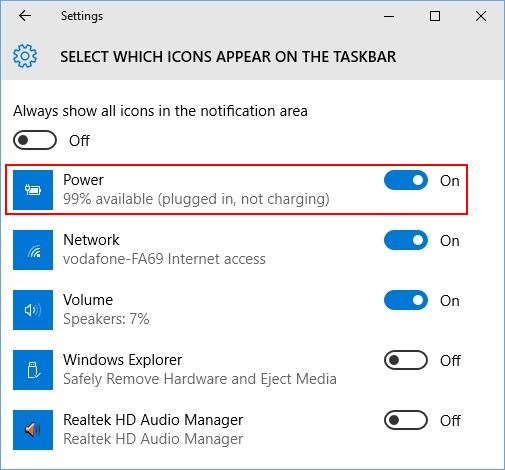
- Go back to the previous System Settings window and this time click the Select which icons appear on the taskbar link.
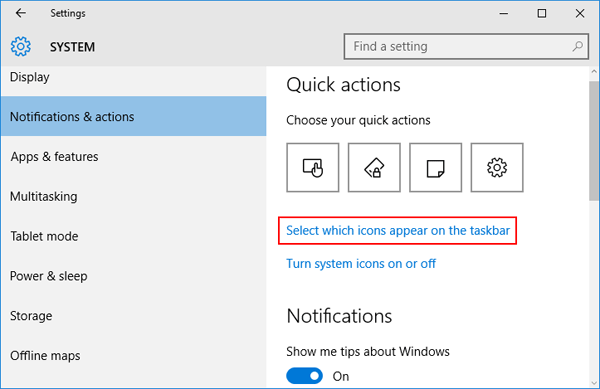
- Look for the Power icon and turn it on.
Now reboot your computer and check if the battery status icon comes back.
Method 2: Restore Missing Battery Icon Using Group Policy
For Windows 10 Enterprise or Pro, you can tweak the group policy to make Windows 10 show the battery icon in system tray notification area:
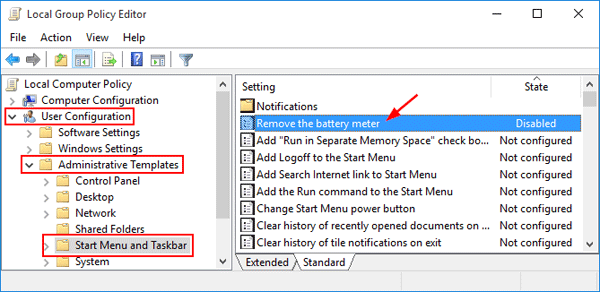
- Open the Local Group Policy Editor and navigate to:
User Configuration -> Administrative Templates -> Start Menu and Taskbar - Double-click the “Remove the battery meter” policy on the right pane and set it to Disabled. Restart your computer to apply your changes.
For Windows 10 Home, you might need to use the following registry hack because the Local Group Policy Editor is not available in your system.
- Open the Registry Editor and navigate to the following key:
HKEY_CURRENT_USER\Software\Microsoft\Windows\CurrentVersion\Policies\Explorer - Look for the HideSCAPower entry on the right pane of Registry Editor. If it doesn’t exist, right-click on the empty space and select New -> DWORD (32-bit) Value, then name it as HideSCAPower.
- Double-click on HideSCAPower, and set the value to 0. (1: Hide the battery status icon, 0: Show the battery status icon)

- Restart your computer and hopefully the battery icon is now back to your Windows 10 taskbar.
Conclusion
If you still have no luck with the solutions above, try to open the Device Manager and uninstall both “Microsoft AC Adapter” and “Microsoft ACPI-Compliant Control Method Battery“, and then click on Action menu -> Scan for hardware changes option. It will restore the battery icon in Windows 10.