Archive for the ‘Tips & Tricks’ category

How to Reset Lost Domain Admin Password in Windows Server 2012

November 3rd, 2012 by Admin

In my previous post I’ve shown you how to install Active Directory in Windows Server 2012. During the procedure of promoting your server to a domain controller, you’ll be prompted to set a strong password for the administrator account in case the password is blank. What to do if you forgot the domain administrator password after installation?
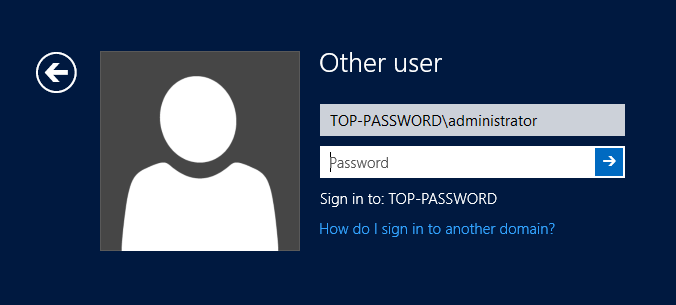
As system/network administrator, you are usually confronted with the problem of forgetting domain admin password. Even if you don’t have to reset a password now, you should get acquainted with this issue. In this tutorial we’ll show you the easiest way to reset a lost domain administrator password in Windows Server 2012.

How to Reset Lost Domain Admin Password in Windows Server 2012?

  1. Download and install Password Recovery Bundle on another computer that you can log in.
  2. Prepare a blank CD and insert it into the computer.
  3. Launch Password Recovery Bundle and click on Windows Password button, it will display the ISO burning dialog.
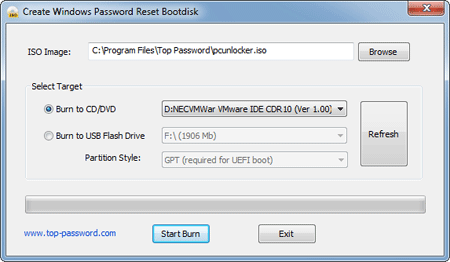
  4. Choose the CD you’ve plugged in and then click on Start Burn button to create a Live CD.
  5. After you have the Live CD, put it into the CD drive of your locked server PC whose password you want to reset.
  6. Turn on the server and have it boot from the Live CD. You may need to go into BIOS and set CD/DVD as the first boot device.
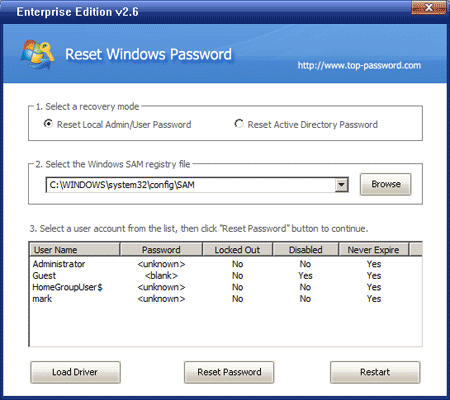
  7. After booting from the Live CD, it will load the Windows PE operating system inside the Live CD and start the Reset Windows Password program.
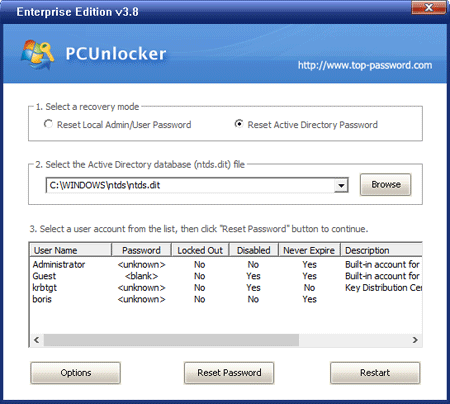
  8. Choose the Active Directory NTDS.dit database, it will display a list of domain user accounts inside the NTDS.dit database.
  9. Choose the administrator account from the list, then click on Reset Password button, the program will replace the forgotten/unknown administrator password with the new password: Password123.

Reject the Live CD and restart the server. You can then log in to the domain administrator account with the new password. It’s so easy to reset a lost domain admin password in Windows Server 2012!
How to Install Active Directory in Windows Server 2012

November 3rd, 2012 by Admin

Similar to previous versions of Windows Server, there are two steps to install Active Directory: First you need to add the Active Directory Domain Services Role to your computer, then run the dcpromo commmand to promote your server to a domain controller. However, in Windows Server 2012, the dcpromo command has been deprecated.

So what replaces dcpromo in Windows Server 2012? There are now two ways to promote your server to a DC: One, through PowerShell and other is Server Manager. Here we will show you how to install Active Directory through Server Manager.

This tutorial can be divided into 2 steps. Before installing Active Directory, please assign a static IP address to your server and set a strong password for the built-in administrator account.

Part 1: Install Active Directory Domain Services

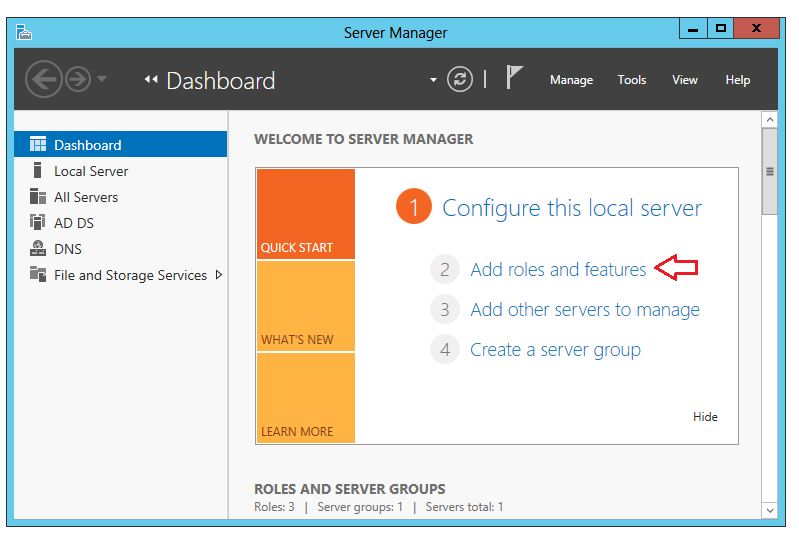
  1. Open Server Manager, then click on Add Roles and Features link.
  2. Click Next on the Before you begin window.
  3. Select Role-based or feature-based installation and then click Next.
  4. Click Select a server from the server pool, click the name of the server to install Active Directory Domain Services to, and then click Next.
  5. Click Active Directory Domain Services. When the Add Roles and Features Wizard dialog box opens, select Add Features, then Next.
  6. On the Active Directory Domain Services page, review the information and then click Next.
  7. On the Confirm installation selections page, click Install.
  8. After the installation has completed, the server will restart.

Part 2: Promote the Server to a Domain Controller

Once above step is completed and all required features have been installed, now is the time to promote the server to a Domain Controller by following the below steps.

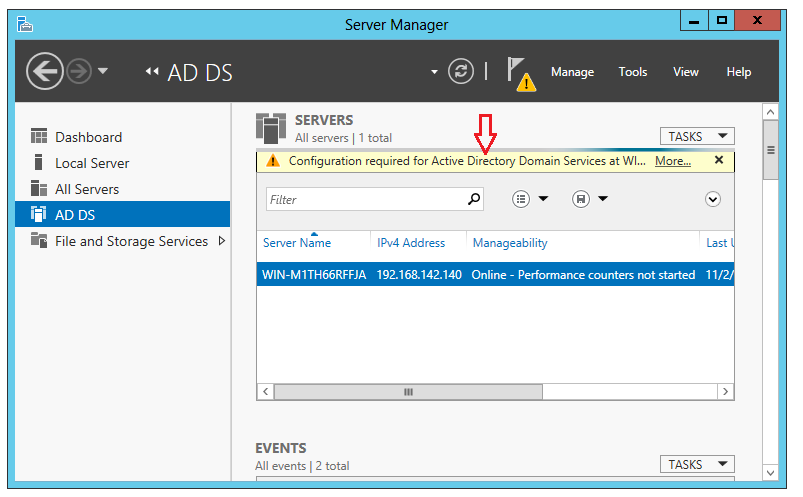
  1. Back in Server Manager, you will notice that AD DS has been added to the left navigation tree. Click on it and then click on More on the right navigation pane where it states that Configuration is required for Active Directory Domain Services.
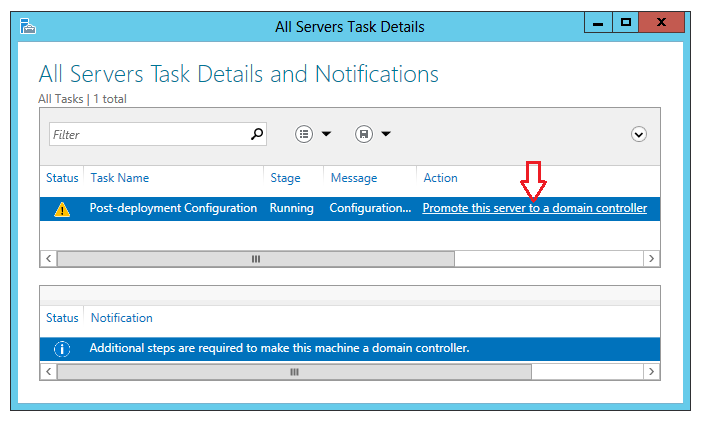
  2. You will now be presented with the All Servers Task Details window, in which you will click on Promote this server to a domain controller under Action.
  3. The Deployment Configuration screen appears and we will select Add a new forest as this is the first domain controller. Enter your Root domain name and then click Next.
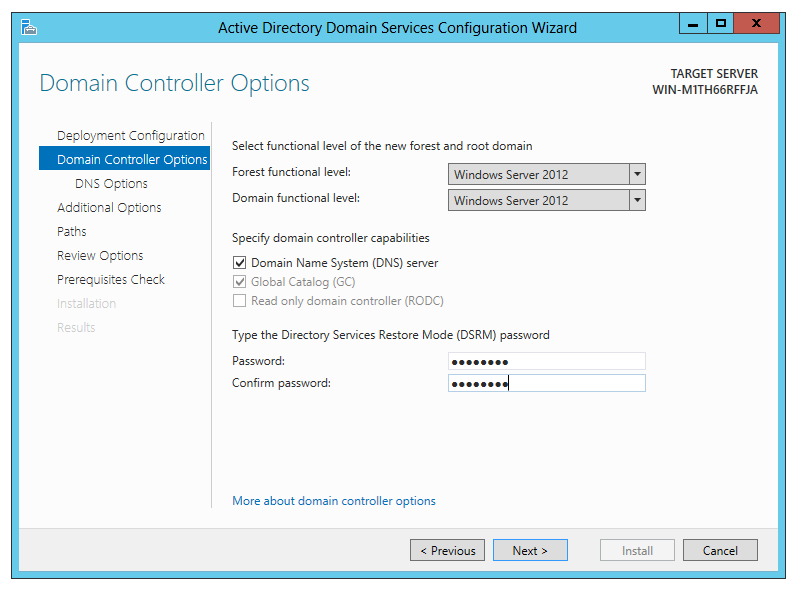
  4. On the Domain Controller Options page select your Forest and Domain functional levels, for this demo will leave the defaults of Windows Server 2012 for both, Enter a desired DSRM Password, click Next.
  5. On the DNS Options page, click Next.
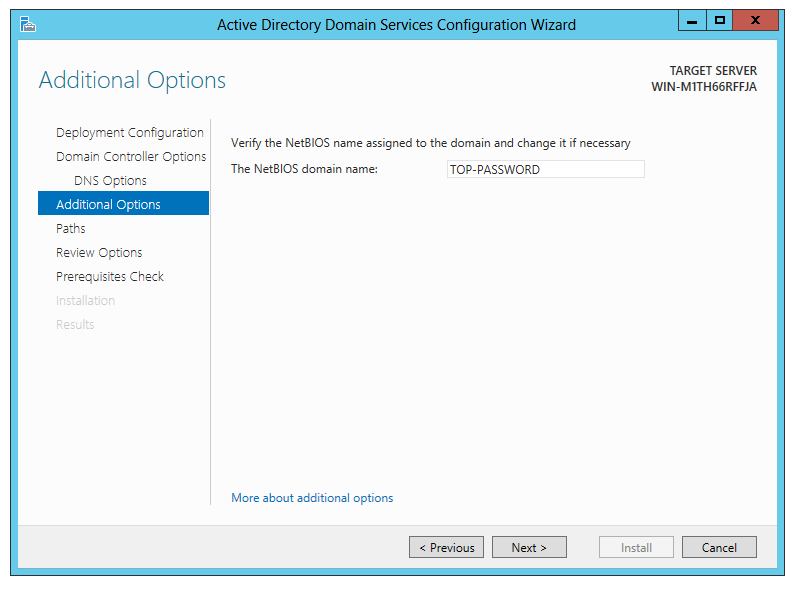
  6. The NetBIOS domain name will then be inputted automatically. In the event of a conflict, it will suggest an alternative by appending the original name with a 0. Click Next.
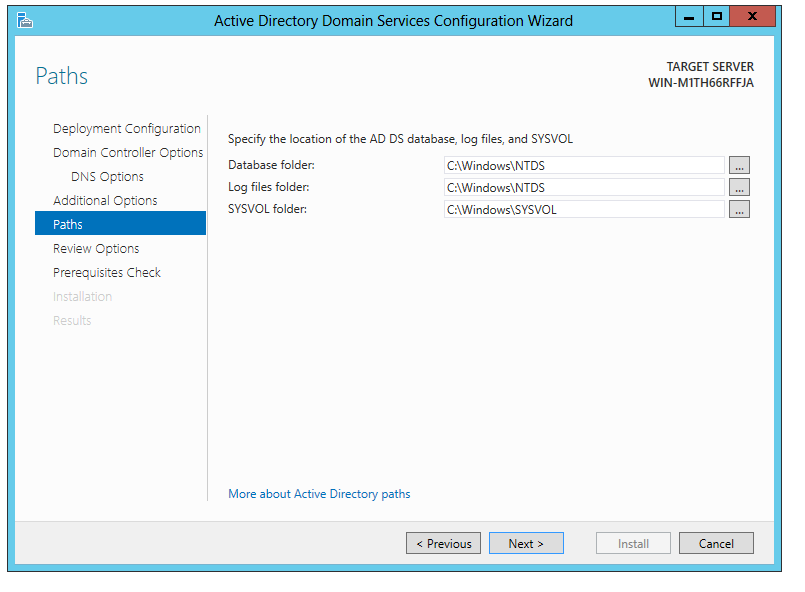
  7. On the Paths page verify the desired locations of the Database, Log files and SYSVOL folders, change the locations is required, click Next.
  8. On the Review Options page, click Next.
  9. The wizard will perform a Prerequisite check before the installation can continue. After the check is completed successfully click Install.
  10. The server will restart once the configuration has completed, the server is now a domain controller for the newly formed domain. Upon restart, you should be able to login using your domain administrator account.

The Best Free Tools to Create a Bootable USB Drive from ISO Image

November 2nd, 2012 by Admin

Having a bootable USB is very essential, especially if your computer doesn’t come with a CD/DVD drive. Using bootable USB drive to install an operating system not only makes the installation faster, but also saves a DVD. You can boot to the USB drive, using it to run the OS setup program, just like a CD or DVD.

Here are the best free tools that allows you to create a bootable USB drive from ISO image. You can burn an ISO of an operating system to a USB drive and install Windows or Linux on a computer.

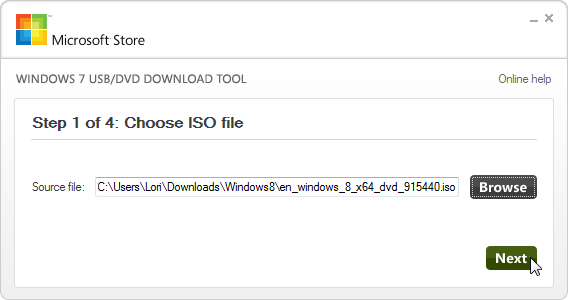
Option 1: Windows 7 USB/DVD Download Tool

Windows 7 USB/DVD Download tool is an official, freeware tool from Microsoft that allows you to burn and write the Windows 7 ISO image to a physical DVD media, USB flash drive (or USB stick), or external and portable USB hard disk, and ensuring the DVD or USB drive is bootable. Been bootable mean the media allows users to install Windows 7 after starting up computer directly without having to first run an existing operating system on the machine.

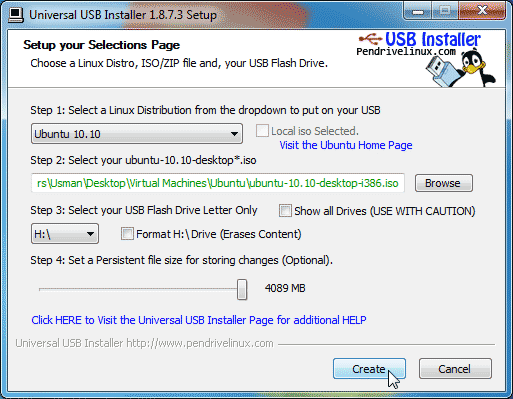
Option 2: Universal USB Installer

Universal USB Installer is a Live Linux USB Creator that allows you to choose from a selection of Linux Distributions to put on your USB Flash Drive. The Universal USB Installer is easy to use. Simply choose a Live Linux Distribution, the ISO file, your Flash Drive and, Click Install.

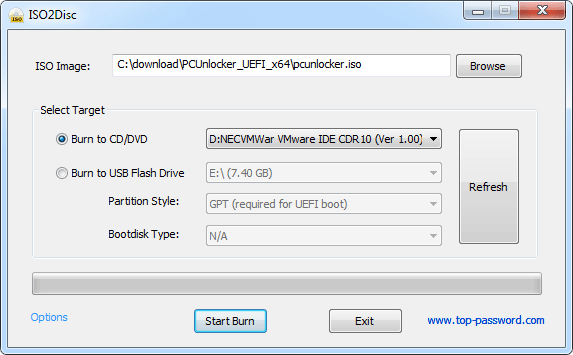
Option 3: ISO2Disc

ISO2Disc is a simple ISO burner software to burn your ISO image file to CD/DVD disc or USB flash drive. It’s the best and most essential free software that allows you to create a bootable USB flash drive from a Windows XP, Vista, Windows 7, Server 2003, or Server 2008 installation CD or DVD. It will also transfer a Windows pre-install environments (WinPE), which are handy for troubleshooting and repairs, to a USB flash drive.

Forgot Windows 8 Administrator Password and Can’t Login

November 1st, 2012 by Admin

Do any of you all know how to reset Windows 8 administrator password once lost or forgotten. Since windows 8 is a completely new concept to me that’s why I want to know how can I reset or restore the password?

What to do if you forgot Windows 8 administrator password? Is there any other option to unlock your computer than re-installing Windows 8? In this tutorial we’ll show you how to reset Windows 8 administrator password in case you forgot the password or the administrator account is locked out or disabled.

How to Reset Forgotten Windows 8 Administrator Password?

  1. Click here to download the Reset Windows Password software. Once the download is complete, unzip the download file and you’ll find the CD ISO image: ResetWindowsPwd.iso.
  2. Burn the ISO image to an empty CD using any CD/DVD recording software such as BurnCDCC or ISO2Disc.
  3. Place the Live CD you’ve created in the CD drive of your Windows 8 computer. Head into the BIOS and set the computer to boot from CD.
  4. The boot procedure may take one or two minutes, and the Reset Windows Password program will start.
  5. From the main window of Reset Windows Password program, you could see the Windows SAM registry file and user accounts inside the SAM file.
  6. Choose the administrator account, and then click on the Reset Password button. It will immediately reset the forgotten administrator password and unlock the user account if it is locked out or disabled.

After resetting Windows 8 administrator password, remove the CD and reboot the computer. You can then log in to Windows 8 administrator account without entering a password. If your computer doesn’t have a CD drive, you can use USB stick to create a Live disk to unlock your forgotten administrator password.

How to Boot to Desktop & Skip the Start Screen in Windows 8

November 1st, 2012 by Admin

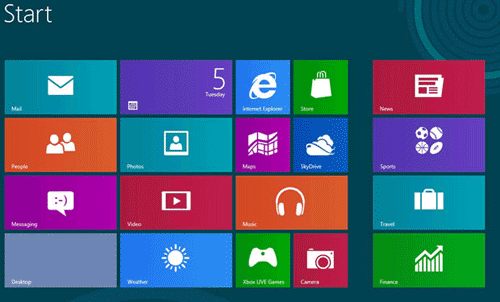
In Windows 8, every time you log in your Windows account, you will be presented with the new Metro-style Start screen as shown below.

In order to get to the desktop in Windows 8, you have to click on the Desktop tile. If you don’t want to see the Start screen every time you log in, here is a quick trick to bypass the Start screen so you can boot straight to the desktop.

How to Boot to Desktop & Skip the Start Screen in Windows 8?

Download the win8desktop.scf file to your Windows 8 computer. Actually, this is a plain text file and but it looks like the shortcut of the Show Desktop icon in the Quick Launch area on Windows XP.

Launch the Task Scheduler. Press Windows + R to launch the Run box. Type taskschd.msc and click OK.

Click on the Create Task link at the right side of the Task Scheduler window.

The Create Task window is opened. In the General tab, provide a name for the task.

Click over to the Triggers tab and use the New button to create a new trigger. In the New Trigger window, set the task to begin At log on and click OK.

Click over to the Actions tab and create a new action. Set the action to Start a program, use the Browse button to select the shortcut you have downloaded, and click OK.

Click over to the Conditions tab and uncheck the Start the task only if the computer is on AC power check box under Power. If you don’t do this, your laptop won’t boot to the desktop if it’s running on battery power.

Click OK and you’re done. Next time when you log in, the computer will automatically skip the Metro-style Start screen and go straight to the desktop instead.

How to Enable GodMode in Windows 8/7

October 31st, 2012 by Admin

GodMode is actually a hidden (or, at least it used to be hidden) developer shortcut in Windows 8/7 that provides more direct access to features and functions of the operating system. To be clear, GodMode doesn’t add functionality. But it helps administrators work more efficiently by collecting all these tweaks and controls in one place.

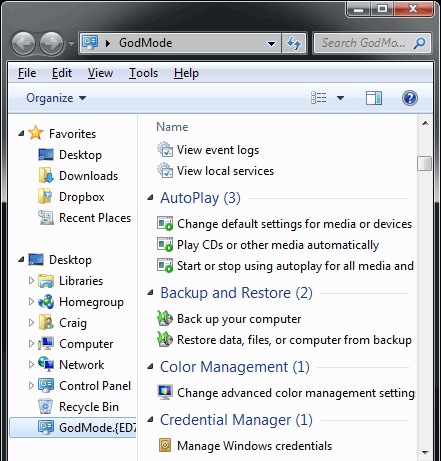
To access the special capabilities of the GodMode folder, create a new folder anywhere on your Windows 8/7 computer and name it:

GodMode.{ED7BA470-8E54-465E-825C-99712043E01C}

Once renamed, the icon will change to a control panel looking icon, and when opened you will be presented with a plethora of different tweaking options.

On my Windows 7 Professional machine, I was shown nearly 50 sections with quick links to configuration options. I find placing this GodMode icon in my desktop very helpful. Whenever I need to open options like network and sharing,printers etc, it makes it very easy to find all this icons placed inside one icon rather than going for the control panel.

How to Hack Windows Administrator Password

October 30th, 2012 by Admin

Most of us have experienced a situation where in we need to gain access to a computer which is password protected or at times we may forget the administrator password without which it becomes impossible to login to the computer. So here is an excellent hack.

In this tutorial we’ll show you how to hack Windows administrator password on Windows 8/7/Vista/XP. The only requirement for this is that you need to find an alternative computer to create a password hacking Live CD. Here is a step-by-step instruction to hack Windows administrator password.

  1. Click here to download the Reset Windows Password software. Once the download is complete, unzip the download file and you’ll find the CD ISO image: ResetWindowsPwd.iso.
  2. Burn the ISO image to an empty CD using any CD/DVD recording software such as BurnCDCC or ISO2Disc.
  3. Place the Live CD you’ve created in the CD drive of your computer with the administrator password you want to hack. Head into the computer BIOS and set your computer to boot from CD.
  4. The boot procedure may take one or two minutes, and the Reset Windows Password program will start.
  5. From the main window of Reset Windows Password program, you could see the Windows SAM registry file and user accounts inside the SAM file.
  6. Choose the administrator account, and then click on the Reset Password button. It will blank your forgotten/unknown password instantly.

Now remove the password hacking Lice CD and restart the computer. You can then log in to the administrator account with a blank password. This hack works even if you forgot the administrator password and can’t log in to Windows.

How to Bypass Windows 7/Vista/XP Admin Password

October 26th, 2012 by Admin

For most Windows users, forgetting the password to an administrator account can be devastating. Hacking your way into the computer is not always easy and trying to remember the password may not do you any good either. Luckily there is a powerful recovery software which allows you to bypass Windows 7/Vista/XP admin password in minutes.

With Reset Windows Password utility you can bypass Windows admin password through booting your computer from a CD or USB drive. Quickly regain access to your locked computer when you forgot the administrator password. This method is a very simple one. You just need to download the software on an alternative computer, and create a bootable CD or USB drive. So you can then use it to boot your computer and remove the forgotten admin password easily.

How to Bypass Windows 7/Vista/XP Admin Password?

  1. Download the zip archive of Reset Windows Password utility to an alternative computer. Once you download the zip file, just unzip it and burn the ResetWindowsPwd.iso file to a blank CD or USB flash drive using ISO2Disc.
  2. Insert the bootable CD/USB drive into the target computer with a forgotten administrator password. Power on the computer and set it to boot from CD or USB, not your local hard drive.
  3. Shortly after loading the operating system inside the CD/USB drive, it will launch the Reset Windows Password program. You’ll see the Windows SAM registry hive and a list of Windows user accounts which are detected by the program.
  4. Choose the administrator account and then click on Reset Password button, it will remove your Windows administrator password immediately.
  5. Remove the bootable CD or USB drive. Restart the computer and you can then log in to your administrator account with a blank password.

With Reset Windows Password utility you can also unlock any locked-out or disabled Windows accounts, and bypass domain administrator passwords on a domain controller. I think, this would be the perfect password recovery tool for both home and business users alike.

How to Unlock BitLocker Encrypted Drive Using the Recovery Key

October 26th, 2012 by Admin

It is always possible to forget the password you set while installing the BitLocker on your drive. In such a situation you should take out the Recovery Key file or the printed recovery key in front of you from where you have placed. With the Recovery Key you can easily unlock the encrypted drive and remove / change the BitLocker password. In this tutorial we’ll go through the steps of unlocking BitLocker encrypted drive using the recovery key.

How to Unlock BitLocker Encrypted Drive Using the Recovery Key?

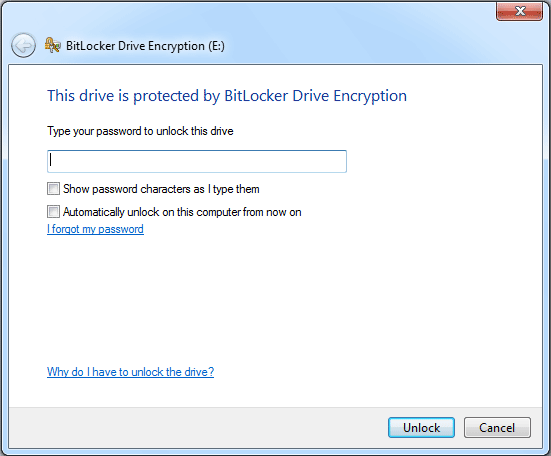
Insert the BitLocker encrypted drive in the Windows system, you will immediately be prompted to enter the BitLocker password.

If you forget your Windows BitLocker password, please click the “I forget my password” link just below the password input text area.

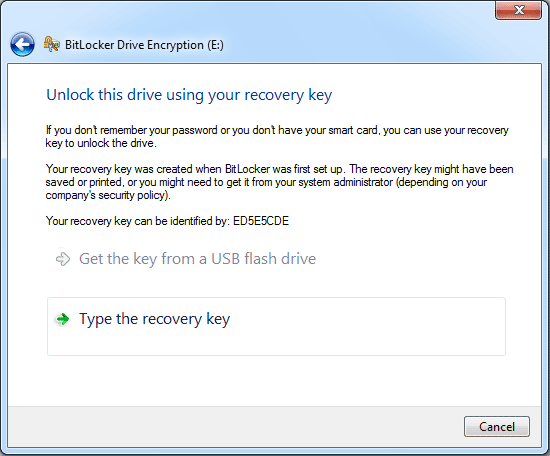
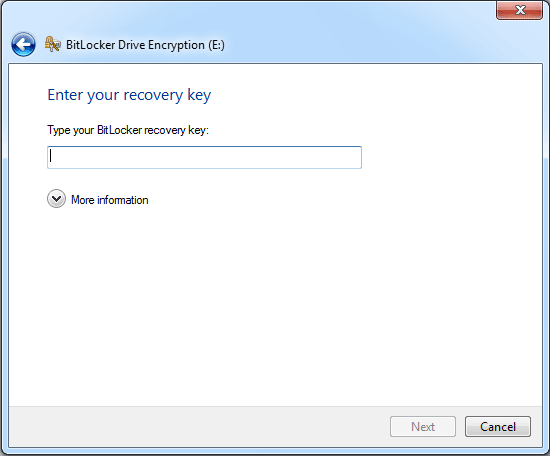
You will be asked for the BitLocker Recovery Key to unlock the drive.

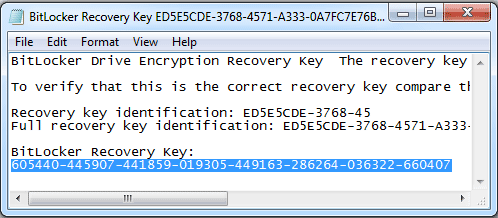
The recovery key was created when BitLocker was first setup. The recovery key might have been saved or printed. Here is the recovery key I saved on my computer.

Copy your BitLocker Recovery Key and paste it into the input box below.

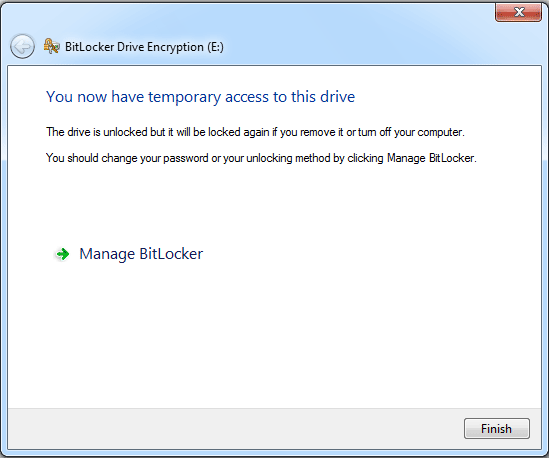
Once the Recovery Key has been accepted, you’ll be granted temporary access to your drive.

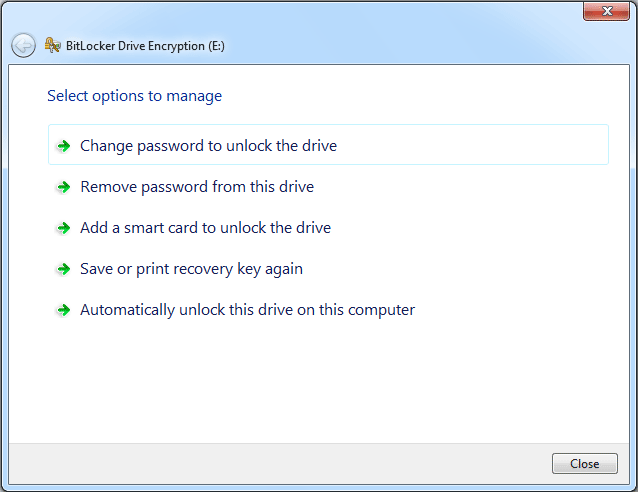
Click on Manage BitLocker link, this will provide you with a list of options that you can use to remove or change your BitLocker password.

A BitLocker recovery key is the only option to unlock your encrypted drive in case you forgot the BitLocker password. Without the recovery key you’ll permanently lost access to all the data on your encrypted drive.