Have you ever forgotten your administrator password? Have you ever bought a used Windows 8 computer with a password on it? Well, Reset Windows Password utility is an advanced bootable utility, which allows you to unlock Windows 8 administrator account easily. It works in any situation that you’re locked out of your own computer, such as the administrator account is locked out or disabled, or you just simply forgot the password. Let’s explain the procedure of unlocking Windows 8 administrator account using a CD or USB flash drive.
How to Unlock Windows 8 Administrator Account?
- First, you will need to download the Reset Windows Password utility on a Windows PC that you can access. This can be your work PC, or a friend or family member’s PC.
- Unzip the download file and you’ll get the ResetWindowsPwd.iso file. Just burn this bootable ISO image to a CD or USB flash drive using ISO2Disc software.
- Next, insert the CD or USB flash drive into your locked Windows 8 computer and boot the computer from it. If you don’t know how to set your computer to boot from CD or USB drive, please refer to this guide: How to Boot A Computer from CD or USB Drive.
- The computer will load the mini operating system inside the CD or USB flash drive and open up the Reset Windows Password window as follow.
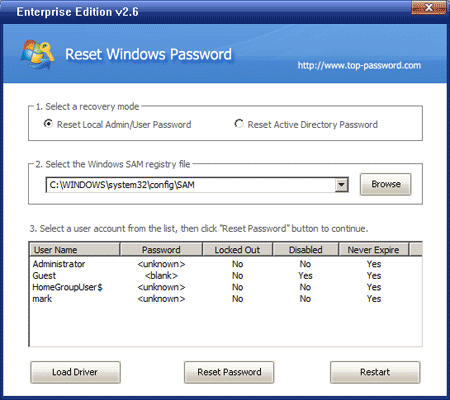
- Choose your desired Windows SAM registry hive from the drop-down list.
- Choose the administrator account and then click on Reset Password button. The program will remove your forgotten administrator password and unlock/enable this user account instantly.
- Restart the computer and remove the CD or USB flash drive, you should then be able to login to your Windows 8 administrator account without being asked to enter a password.
After logging back into your Windows 8 computer, you can set a new password for the administrator account. Try to make your password hint something that only you would understand. If you do forget your password and make up a hint that’s too good even for yourself to crack.


