Windows 8 introduces three new ways of authenticating yourself other than just using a traditional password. Now you can use a PIN code, Picture Password, as well as Microsoft account for logging into your computer. From the Windows login screen, you can switch between these sign-in options.

However, in some situations you might not be allowed to create a PIN or Picture Password, or the sign-in options of PIN and Picture Password are not shown up at Windows login screen. If you’re facing such problem, here is how to fix it.
1: Picture Password / PIN code disabled after joining a domain
Domain users are not allowed to sign in with a PIN by default. After joining to a domain or adding an Exchange email account, Picture Password or PIN authentication might be not available. However, you can easily turn on the Picture Password / PIN sign-in options by modifying the group policy:
- Press the Windows key + R keyboard combination to open a Run box, then type gpedit.msc and press Enter.
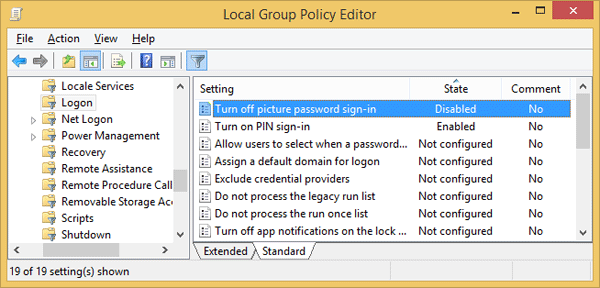
- When the Group Policy editor opens, navigate to the following key:
Computer Configuration\Administrative Templates\System\Logon
- On the right pane, double-click on the “Turn on PIN sign-in” option. Set it to Enabled, and click Apply.
- Double-click on the “Turn off picture password sign-in” option and set it to Disabled. Click Apply.
- After restarting the system, you should be able to create and use Picture Password and PIN sign-in.
Of course, this method will only be useful in a domain environment, in which case you could assign this group policy setting to an OU in Active Directory.
2: PIN sign-in option disabled after entering PIN Code wrong many times
If you have entered the wrong PIN too many times, the PIN sign-in option will immediately disappear from Windows logon screen. There is no other way to get the PIN code back to work, except that you can still login with other sign-in options, delete the existing PIN code and set a new one.
If you couldn’t also log on with your local / Microsoft account, this will essentially lock you out of your own computer. In this situation, you need to use some third-party boot disks such as PCUnlocker to unlock your Windows local / Microsoft account.
3: Disable the policy “Do not display last user name”
It is good practice to enable the local security policy “Interactive Logon: Do Not Display Last User Name” in Windows. Despite this setting can improve the security of your computer, it will also cause the Picture Password and PIN sign-in options disappeared at the Windows logon screen.
To bring the Picture Password / PIN sign-in options back, you need to disable that security policy again. Here’s how:
- Press the Windows key + R keyboard combination to open a Run box, then type secpol.msc and press Enter.
- In the left pane of Local Security Policy window, navigate to
Local Policies -> Security Options.
- On the right hand side, double-click on the “Interactive Logon: Do Not Display Last User Name” setting. Now switch the radio button from Enabled to Disabled, then click Apply.
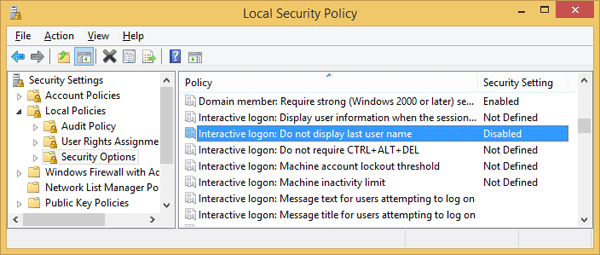
- Restart your computer and the Picture Password / PIN code sign-in options will be back.
If you’re running a version of Windows 8 that doesn’t come with the Group Policy Editor, use this registry trick to disable that security policy:
- Press the Windows key + R keyboard combination to open a Run box, then type regedit and press Enter.
- In the left pane of Registry Editor, navigate to the following key:
HKEY_LOCAL_MACHINE\SOFTWARE\Microsoft\Windows\CurrentVersion\Policies\System
- On the right hand side, double-click on dontdisplaylastusername and then modify the value to 0.
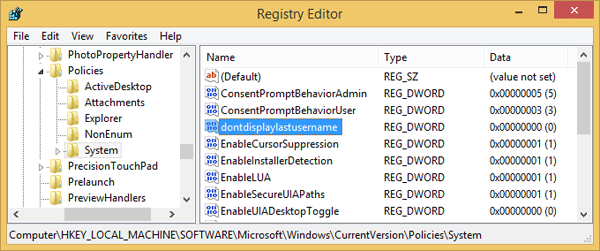
- You also need to restart your computer for the changes to take effect. That’s it!