Archive for the ‘Windows 10’ category

Fix: Windows Computer Won’t Wake Up from Sleep Mode

November 16th, 2017 by Admin

Computer won’t wake up from sleep mode? When your computer goes sleep, you’re supposed to wake it up by pressing a key or moving your mouse. However, there are many reasons that can cause Windows stuck in sleep mode, including improper BIOS / device / power settings. Here’s a step-by-step guide to help you troubleshoot the issue of computer not waking up from sleep mode in Windows 10, 8 and 7.

Step 1: Find Which Device can Wake up Your Computer

Can’t get your computer come out of sleep mode? To fix this problem, you have to find out which device can wake up your computer. Open the Command Prompt and run the following command:

powercfg -devicequery wake_armed

It will show you the list of devices that are configured to wake your computer up. If your keyboard or mouse is not listed, you need to enable the “Allow this device to wake the computer” setting in your computer. Follow these steps:

  1. Open the Device Manager. Expand the Keyboards category, then right-click on your keyboard device and choose Properties.

  2. Click the Power Management tab and check the Allow this device to wake the computer box. Click OK to save your change.

  3. Repeat the same steps above for your mouse, which can be found under the “Mice and Other Pointing Devices” category in the device list.

Step 2: Stop Windows from Powering Off USB Devices

Windows is set to shut down your USB devices in sleep mode to save power by default, sometimes it won’t be able to power it back up. So you should follow this tutorial to stop Windows from disabling power to USB ports when your computer is in sleep mode.

Step 3: Enable USB Wakeup in Your Computer’s BIOS

While turning on your computer, press a certain key (F2, DEL, F12, ESC, etc.) to access the BIOS Setup. Look around the BIOS settings and find the option like “USB Wake Up”, “Wake up by USB KB/Mouse”, “USB Wake Support”. Make sure it is enabled.

Conclusion

Once you complete the steps above, you should be able to bring your computer out of sleep mode using keyboard or mouse. If those still don’t help, try to restore the power plan to default settings in Windows, or update the BIOS of your computer.

Set Windows to Power On / Off USB Devices in Sleep Mode

November 16th, 2017 by Admin

Keyboard or mouse not working after your PC wake up from sleep? When you’re charging your phone through an USB port, putting your PC into sleep mode will turn off the power to USB ports, and your phone will stop charging. In this tutorial we’ll show you 2 methods to set Windows to power on or off USB devices in sleep mode.

Method 1: Enable / Disable Power Saving on USB Ports

  1. Press the Windows key + R to open the Run box. Type devmgmt.msc and press Enter.
  2. When the Device Manager window opens, expand the Universal Serial Bus controllers branch, then right-click the USB Root Hub device and select Properties.

  3. Click the Power Management tab. If you want USB ports to keep supplying power in sleep mode, just uncheck “Allow the computer to turn off this device to save power“. Or check it to let Windows turn off USB ports to save power.

  4. Repeat steps 3 and 4 for all of the USB Root Hubs on the computer.

Note: Windows will clear the check box “Allow the computer to turn off this device to save power” when the device is unplugged from the USB port or the PC is restarted. To keep this from happening, use the method below to disable USB selective suspend setting.

Method 2: Enable / Disable USB Selective Suspend Setting

  1. Press the Windows key + R to open the Run box. Type powercfg.cpl and press Enter.
  2. When the Power Options window opens, click the Change plan settings link to the right of your current power plan.

  3. Click the “Change advanced power settings” link.

  4. Expand the “USB settings” and then expand “USB Selective suspend setting“. Set it to Disabled if you want to stop Windows from powering down any connected USB devices.

  5. Click Apply to save your changes.

How to Restore Power Plan Settings to Default in Windows 10

November 15th, 2017 by Admin

How do I restore default power settings in Windows 10? Windows lets you change the power plan settings to reduce the amount of power your computer uses or maximize performance. If you’ve messed up the power plan settings, here are 2 simple ways to restore power plan settings to default in Windows 10.

Method 1: Restore Power Plan Settings to Default from Power Options

  1. Open the Control Panel and switch the View by mode to Large icons, and then click on Power Options.

  2. Click on the Change plan settings link to the right of your current power plan.

  3. Click on Restore default settings for this plan.

  4. A new window will pop up, and ask you if you are sure about the choice. Click Yes.

  5. Now you’ve restored the current power plan to default settings.

Method 2: Restore Power Plan Settings to Default from Command Prompt

  1. Open the Command Prompt. Type the following command and press Enter.

    powercfg –restoredefaultschemes

  2. Now you have successfully reset the power plan settings on your computer.

2 Ways to Change MAC Address on Windows 11 / 10 / 8 / 7

November 11th, 2017 by Admin

MAC address is used to identify a computer on a network, and every network card has a unique MAC address assigned during manufacturing. However, most network cards also allow you to set a custom MAC address from their device properties on Windows. This is useful when you want to test or bypass the MAC filtering settings on firewall or router. Here are 2 simple ways to change MAC address on Windows 11 / 10 / 8 / 7.

Method 1: Change MAC Address on Windows 11 / 10 / 8 / 7 from Device Manager

  1. To get started, you need to open Device Manager. Just press Windows key + R on your keyboard and then type devmgmt.msc in the Run dialog box. Hit Enter.

  2. Expand Network adapters, right-click your Ethernet or Wireless adapter and then select Properties.

  3. Click the Advanced tab. Within the Property list, scroll down until you find the “Network Address” or “Locally Administered Address” property. Select the Value radio box and enter your new MAC address.

  4. Click OK to apply. To confirm your change, open the Command Prompt and type ipconfig /all and hit Enter. You should see the new MAC address show up in the line starting with “Physical Address“.

Method 2: Change MAC Address on Windows 11 / 10 / 8 / 7 from Registry Editor

  1. Open the Registry Editor and navigate to the following key:
    HKEY_LOCAL_MACHINE\SYSTEM\CurrentControlSet\Control\Class\{4D36E972-E325-11CE-BFC1-08002BE10318}
  2. You should see several subkeys with names such as 0000, 0001, etc. You have to click each subkey to check the DriverDesc value that matches with your network card. In my example, I got the key in 002.
  3. Look for the registry entry NetworkAddress in the right pane, and change the value as your new MAC Address. If that entry doesn’t exist, right-click blank area to create a String value with the name NetworkAddress.

  4. Close Registry Editor. Disable your network adapter and enable it again. The new Mac address will apply immediately.

That’s it!

How to Open ODBC Data Source Administrator in Windows 10

November 10th, 2017 by Admin

How can I open the 32-bit ODBC Data Source Administrator in Windows 10 64-bit? ODBC Data Source Administrator is a Windows component that lets you create and manage ODBC data sources. In this tutorial we’ll show you 5 ways to open ODBC Data Source Administrator in Windows 10.

Note: The 32 -bit version of the ODBC Data Source Administrator must be used to configure data sources for 32- bit applications.

Method 1: Open ODBC Data Source Administrator from Control Panel

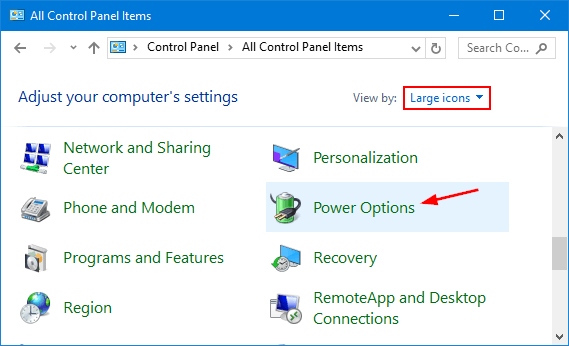
Open the Control Panel and set the View by option to Large icons, and click Administrative Tools.

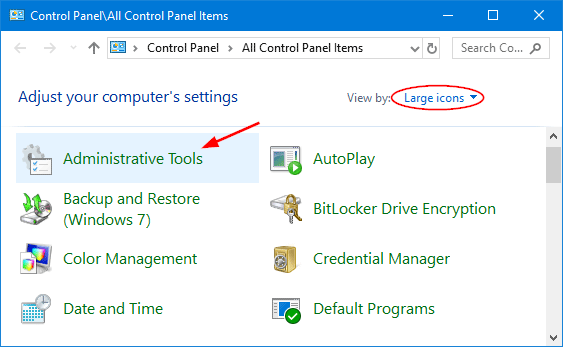
You can then access both 32-bit and 64-bit versions of ODBC Data Source applet.

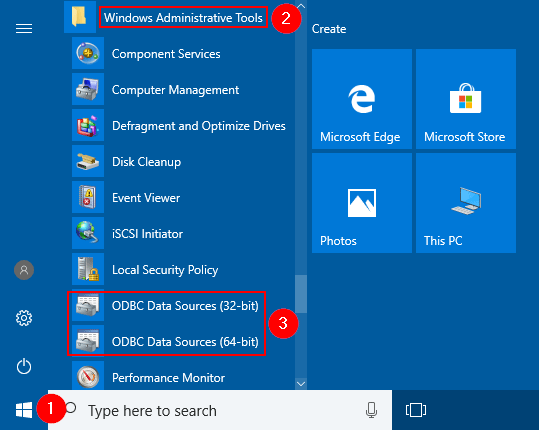
Method 2: Open ODBC Data Source Administrator from Start Menu

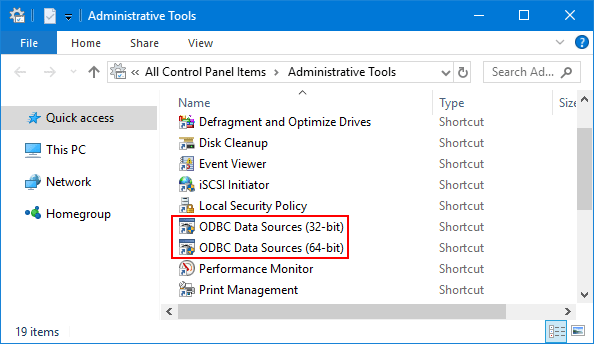
Click the Start button. When the Start Menu comes up, scroll down until you see the “Administrative Tools” folder. Expand that folder and you can then open either ODBC Data Source (32-bit) or ODBC Data Source (64-bit).

Method 3: Open ODBC Data Source Administrator via Search

Simply type odbc into the Cortana Search box on your Windows 10 taskbar, the ODBC Data Source tool will show up in the search result and you can click to launch.

Method 4: Open ODBC Data Source Administrator via Run or Command Prompt

Open the Command Prompt, or press the WIN + R keys to open the Run dialog box. Type odbcad32 and press Enter.

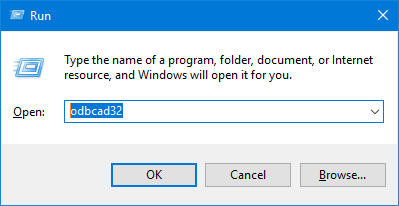
If you’re running Windows 10 64-bit, this should launch ODBC Data Source (64-bit). Otherwise, it will open ODBC Data Source (32-bit) instead.

Method 5: Create ODBC Data Source Administrator Shortcut

A 32-bit version of Windows includes only ODBC Data Source (32-bit), which is located in C:\WINDOWS\System32\odbcad32.exe

If you’re running Windows 64-bit operating system, you can access both 32-bit and 64-bit ODBC Data Source from the following locations:

  • ODBC Data Source (64-bit) – C:\WINDOWS\System32\odbcad32.exe
  • ODBC Data Source (32-bit) – C:\WINDOWS\SysWOW64\odbcad32.exe

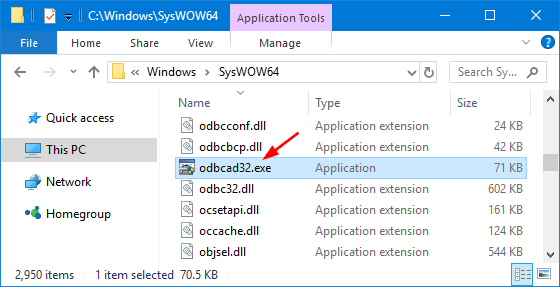
When you need to access ODBC Data Source frequently, you can create a desktop shortcut that points to odbcad32.exe.

How to Reset PIN from Lock Screen on Windows 10 Fall Creators Update

November 9th, 2017 by Admin

Forgot your PIN login and can’t sign into Windows 10? Starting from Windows 10 Fall Creators Update, the lock screen lets you reset lost PIN when using a Microsoft account. In this tutorial we’ll walk you through the steps to reset forgotten PIN from the lock screen on Windows 10 Fall Creators Update.

How to Reset PIN from Lock Screen on Windows 10 Fall Creators Update?

  1. When you’re at Windows 10 sign-in screen, click the “I forgot my PIN” link just below the PIN box.

  2. You’ll see the Just a moment screen while Windows prepares to reset PIN. Enter your Microsoft account password and click Next.

  3. If you have enabled two-step verification for your Microsoft account, you have to enter the recovery email address or phone number to verify your ownership.

  4. Enter the security code you’ve received from Microsoft, and click Next.

  5. The subsequent screen will warn you that it’s possible that resetting your PIN could result in data loss. Click Continue to confirm.

  6. A popup will appear and you’re prompted to set up a PIN. Enter your new PIN code twice and click OK.

    After resetting PIN successfully, it will take you back to the sign-in screen, where you can log in to Windows 10 with your new PIN.

However, the “I forgot my PIN” option is only available at the sign-in screen when using a Microsoft account. If you’re using a local account, you have to reset forgotten PIN from the Settings app on Windows 10.

Change from Double Click to Single Click to Open Folders in Windows 10

November 8th, 2017 by Admin

By default, Windows allows you to open items (files, folders or applications) with a double left click. If you’re tired of double-tapping on your mouse or touchpad, you can enable single click to open folders or files. In this tutorial we’ll show you how to change from double click to single click to open folders/files in Windows 10.

How to Change from Double Click to Single Click to Open Folders in Windows 10?

  1. Type folder options into the Cortana Search box, which is located at the bottom left corner of the Windows 10 taskbar. Click on File Explorer Options.

  2. On the General tab in Folder Options, enable the option Single-click to open an item (point to select).

    Update: If the “Single-click to open an item (point to select)” option is greyed out, you need to disable the “Turn on Classic Shell” group policy.

  3. Click Apply then OK to save the settings. Now, when you move your mouse over a folder or file, it will underline the icon title and you can open it with a single click.

That’s it! If you would like to open items with double-click later on, just open the Folder Options and enable the option Double-click to open an item (single-click to select).

Add Devices and Printers To My Computer in Windows 10 / 8 / 7

November 6th, 2017 by Admin

How can I find Devices and Printers in Windows 10? Devices and Printers lets you easily view and manage peripheral devices in one place, such as printers, webcams, external storage devices and monitors. In this tutorial we’ll show you how to add Devices and Printers to My Computer (or “This PC”) in Windows 10 / 8 / 7.

How to Add Devices and Printers To My Computer?

  1. Open the Command Prompt as administrator.
  2. Copy-paste the following command and press Enter.

    reg add HKEY_LOCAL_MACHINE\SOFTWARE\Microsoft\Windows\CurrentVersion\Explorer\MyComputer\NameSpace\{A8A91A66-3A7D-4424-8D24-04E180695C7A}

  3. Once pressing Enter, open the Windows Explorer again and you can see the “Devices and Printers” shortcut appear in My Computer (or “This PC”).

If you want to remove Devices and Printers from My Computer (or “This PC”) again, just copy-paste the following command instead:

reg delete HKEY_LOCAL_MACHINE\SOFTWARE\Microsoft\Windows\CurrentVersion\Explorer\MyComputer\NameSpace\{A8A91A66-3A7D-4424-8D24-04E180695C7A} /f

It’s that simple!

How to Open the Devices and Printers in Windows 10

November 6th, 2017 by Admin

Device and Printers gives you a simple way to access and manage external devices (including printers, scanners, faxes, cameras) connected to your computer. From there you can see how many documents are in the printing queue, set the paper size for printing, add or delete a printer, etc. In this tutorial we’ll show you 4 quick ways to access the Devices and Printers in Windows 10.

Method 1: Open the Devices and Printers in Windows 10 from Run or Command Prompt

Simply press the Windows key + R shortcut to bring up the Run dialog, or open the Command Prompt. Type control printers and press Enter. The Devices and Printers window will open immediately.

Method 2: Open the Devices and Printers in Windows 10 from Control Panel

Open the Control Panel and choose Large icons under the View by drop-down list. Click on Devices and Printers.

Method 3: Open the Devices and Printers in Windows 10 from Settings

Press the Windows key + I shortcut to open Settings, and then click Devices.

Scroll down to the “Related settings” section on the right pane, click the Devices and printers link.

Method 4: Add the Devices and Printers Context Menu in Windows 10

If you need to access Devices and Printers frequently, you can add Devices and Printers to the Desktop context menu. Follow these steps:

  1. Download the registry files from this link (in .zip format). Extract the zip archive and you’ll get two .reg files.
  2. Double-click on the add-devices-and-printers-context-menu.reg file in File Explorer.
  3. When you see the User Account Control, click Yes to continue. Afterwards, click Yes to add the information to Registry.

  4. Now, right-click on the empty space on your desktop. You can get to the “Devices and Printers” shortcut from the context menu.

How to Remove / Restore “3D Objects” Folder on Windows 10

November 3rd, 2017 by Admin

After upgrading to Windows 10 Fall Creators Update, you may noticed a weird folder under This PC of File Explorer. It’s called 3D Objects. By default, that folder is empty and any creations you make in Paint 3D or 3D Builder application are saved into it.

If you’re not interested in 3D printing, you can remove the “3D Objects” folder from ‘This PC’ in File Explorer. Here’s a simple way to remove or restore “3D Objects” folder on Windows 10.

Part 1: Remove “3D Objects” Folder on Windows 10

  1. Open the Command Prompt in Windows 10.
  2. Copy and paste the following command in the Command Prompt, and press Enter.

    reg delete HKEY_LOCAL_MACHINE\SOFTWARE\Microsoft\Windows\CurrentVersion\Explorer\MyComputer\NameSpace\{0DB7E03F-FC29-4DC6-9020-FF41B59E513A} /f

  3. You’re now done. Close File Explorer and open it again, the “3D Objects” folder should be gone from ‘This PC’ on Windows 10.

Part 2: Restore “3D Objects” Folder on Windows 10

If you want to restore the “3D Objects” folder back to ‘This PC’ in File Explorer, just run the following command at the Command Prompt:

reg add HKEY_LOCAL_MACHINE\SOFTWARE\Microsoft\Windows\CurrentVersion\Explorer\MyComputer\NameSpace\{0DB7E03F-FC29-4DC6-9020-FF41B59E513A}

When it’s done, open File Explorer again and you’ll see the ‘3D Objects’ folder reappear in ‘This PC’.