Is there a way to choose what local drives may be viewed by specific users? How can I restrict access to certain drive on the machine? Windows 10 comes with a group policy setting that allows you to prevent other users from accessing to the content of selected drives. This is useful if you share your PC with others, but you want to restrict access to a drive for other accounts in the same computer.
Note: This setting won’t prevent users from using programs (for example, Command Prompt) that access the local drives. If you need to a professional folder protection software, you can try Protect My Folders.
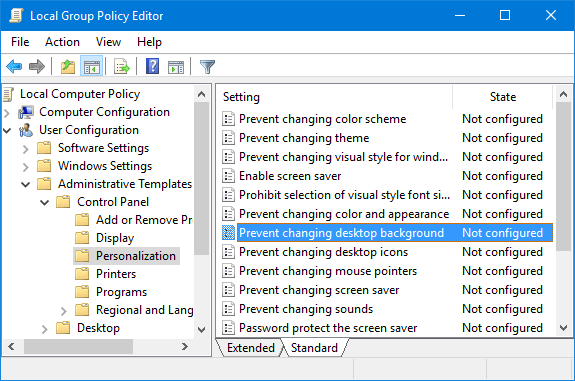
Method 1: Prevent Access To Drives in My Computer in Windows 10 Using Group Policy
- Press the Windows key + R to open the Run box. Type gpedit.msc and hit Enter.

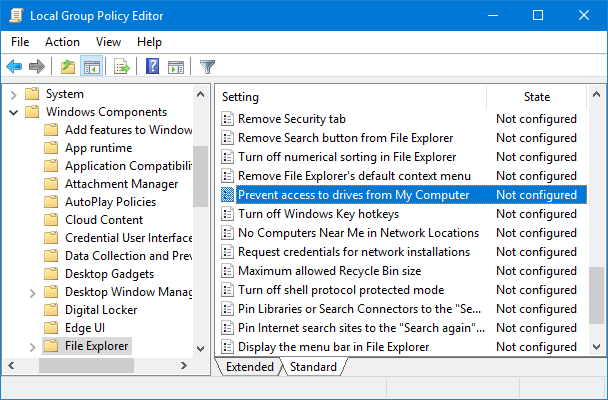
- Once Local Group Policy Editor is launched, use the left pane to navigate to User Configuration > Administrative Templates > Windows Components > File Explorer. Now go to the right pane and scroll to find “Prevent access to drives from My Computer” and double-click on it.
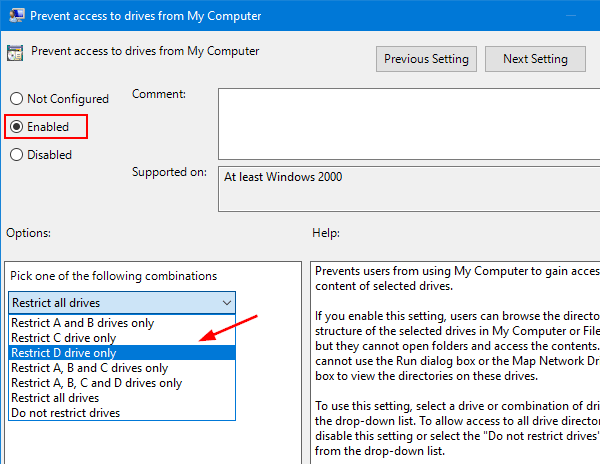
- When the configuration box pops up, change the setting to Enabled. Next move to the Options section at the bottom left, and use the drop-down menu to select the combination of disk drives for which you want to prevent user access. Click Apply and then OK.
- The policy setting will take effect immediately, no restart is required. When a user try to open the restricted drive in File Explorer, they will receive the following error message:
“This operation has been cancelled due to restrictions in effect on this computer. Please contact your system administrator“
Method 2: Prevent Access To Drives in My Computer in Windows 10 Using Registry Editor
- Press the Windows key + R to open the Run box. Type regedit and hit Enter.

- Once the Registry Editor window is launched, navigate to the following key:
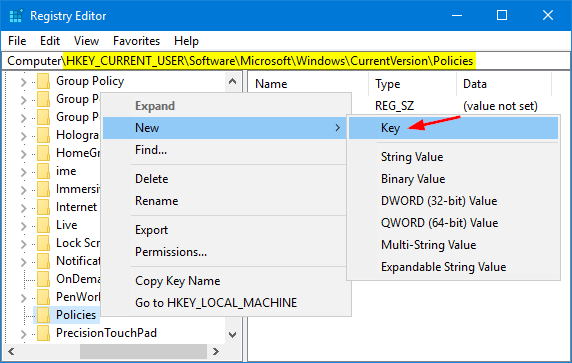
HKEY_CURRENT_USER\Software\Microsoft\Windows\CurrentVersion\Policies\ExplorerIf the Explorer key does not exist, you can right-click on Policies, select New -> Key and name it Explorer.
- Right-click on the Explorer key in the left pane, and then select New -> DWORD (32-bit) Value, name it NoViewOnDrive.
- Next, double-click NoViewOnDrive and set its value according to following list (in Decimal):
A: 1, B: 2, C: 4, D: 8, E: 16, F: 32, G: 64, H: 128, I: 256, J: 512, K: 1024, L: 2048, M: 4096, N: 8192, O: 16384, P: 32768, Q: 65536, R: 131072, S: 262144, T: 524288, U: 1048576, V: 2097152, W: 4194304, X: 8388608, Y: 16777216, Z: 33554432, ALL: 67108863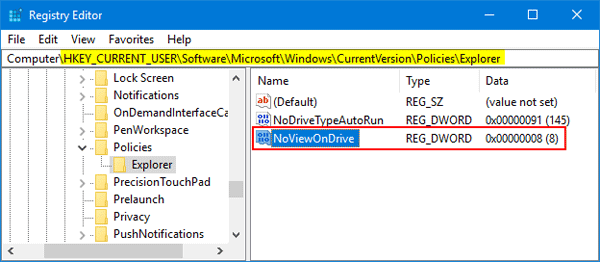
For example, if you want to lock drive D, you have to set the value to 8. If you want to lock both Drive A and drive D, you would add 1 (A) + 8 (D) which means the value should be set to “9”.
- When it’s done, close Registry Editor. Restart Windows for the change to take effect.