Provide the best software to recover passwords for
Windows, SQL Server, PDF, Word, Excel, Outlook, FTP, Email, etc.


How to Take Ownership of Windows Folders or Files
When you try to access, replace, modify or delete a file or folder in Windows, you may receive an error "Access Denied" or "You don't currently have permission to access this folder", which indicates that you don't have permissions to access that folder or file. To gain full access permissions, you must take ownership of that folder or file.
TakeOwnershipPro is a light-weighted yet powerful freeware that makes taking ownership too simple and requires no more than a click. In this tutorial we will show you how to use this program to take ownership of a file or a folder to which you are denied access.
Download and Install TakeOwnershipPro
- Click here to download the setup package of TakeOwnershipPro and save it in a place that is easy to find, such as your PC desktop.
- When the download is complete, double-click the downloaded file to run the installation wizard. Follow the on-screen instructions to complete the installation.
- After installing, the program will create a shortcut on the desktop, and add the "TakeOwnershipPro" option to the right-click menu in Windows Explorer.
Method 1: Take Ownership by Dragging and Dropping
- Start the TakeOwnershipPro program from the desktop shortcut or Start Menu.
Click the Add button to choose the folder or file which you want to take ownership of, or simply drag the folder/file from Windows Explorer and then drop it to this program.

Tips: To drag and drop a file or folder, click it with your left mouse button, then, without releasing the button, drag it to the TakeOwnershipPro program and release the mouse button to drop it.
- Click Take Ownership button. If you want to take ownership of all subfolders and files inside your selected folder, tick the checkbox "Include subfolders and files".
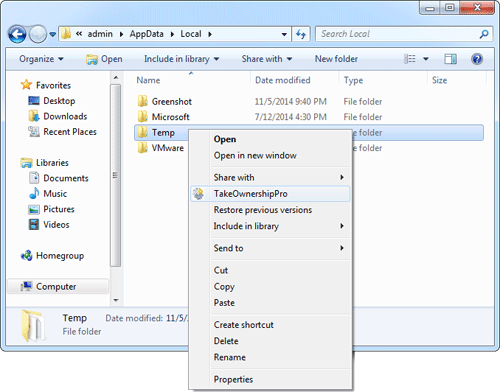
Method 2: Take Ownership from Right-click Context Menu
Locate the folder or file on which you want to take ownership in Windows Explorer. Right-click on the folder or file and select TakeOwnershipPro from the context menu.
- If the User Account Control dialog box appears, click Yes to allow TakeOwnershipPro to run and make changes.
- Now you should get the confirmation dialog box stating that the ownership is granted.
If you want to take ownership of multiple folders or files at one time, right-click on your selected folders or files in Windows Explorer, and then select TakeOwnershipPro.
Free Download
Related Articles