Whether your system has been running slow or caught a virus, just perform a factory reset and everything will come back to normal. This will completely wipe your hard drive and restore the Windows system back to the state when you first bought it.
Most computers don’t come with Windows setup discs any more. Instead PC manufactures create a hidden recovery partition for their PCs. If your computer has a recovery partition, you can run the manufacturer’s recovery tool to restore your PC to factory settings. Here we’ll show you how to restore Dell/HP/Acer/Sony/ASUS/Toshiba/Gateway/Lenovo computers to its original factory shipped state.
Note: Factory reset will remove all your programs, files, passwords and other sensitive information. Make sure you back up all your personal files and gather the programs you’d like to reinstall. If you’ve forgotten the saved passwords or misplace your software license key, you can recover them with Password Recovery Bundle.
DELL: Dell Factory Image Restore
- Turn on the computer. When the Dell logo appears on the screen, press F8 several times to open the Advanced Boot Options menu.
- Use the Arrow keys to select Repair Your Computer and then press Enter.
- Specify the language settings that you want, and then click Next.
- Log in as a user who has administrative credentials, and then click OK.
- Depending on your configuration, you may need to select Dell Factory Tools and then Dell Factory Image Restore. Click Next to open the Confirm Data Deletion menu.
- Select the Yes, reformat hard drive and restore system software to factory condition check box and click Next.
- When the restore operation is completed, click Finish to restart the computer.
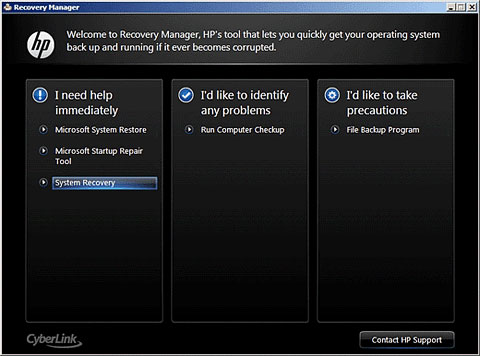
HP: HP System Recovery or Recovery Manager
- Turn on the computer and repeatedly press the F11 key, about once every second, until Recovery Manager opens.
- Under I need help immediately, click System Recovery.
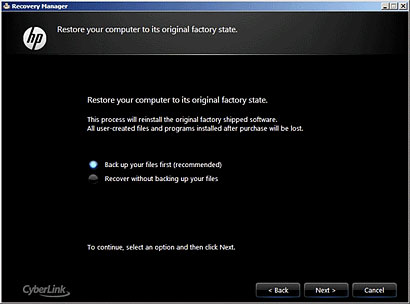
- Before restoring the computer to its original factory shipped condition, the program will prompt you to back up your files. Select Recover without backing up your files and click Next if you’ve already backed up personal files.
- Click OK in the warning that appears.
- After the system recovery is complete, click Finish to restart the computer. Complete the setup screens and wait until the computer finishes the setup.
Acer: Acer eRecovery
- Once your computer turned on, press and hold Alt key, then continuous press F10 button until you see Acer eRecovery System is running.
- Click Restore Operating System to Factory Defaults.

- Click Next. Your hard drive’s original, factory-loaded contents will be recovered. The entire system restoration process takes about 40 minutes (may be vary for different computer).
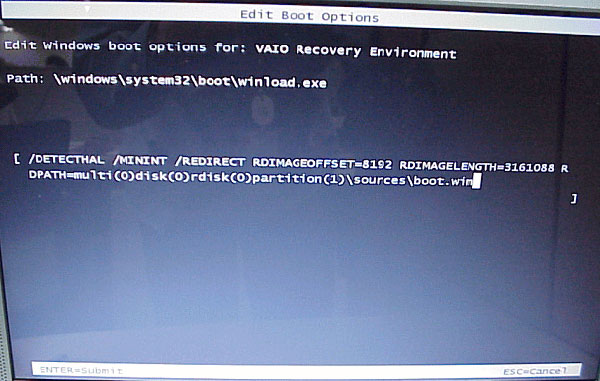
Sony: Sony Vaio Recovery
- Restart the computer and immediately begin tapping the F10 key until the Edit Boot Options screen is displayed.
- At the Edit Boot Options screen, press the Enter key.
- Choose Restore C: Drive and click Next.
- Tick the checkbox next to I Understand, click Start and confirm with Yes when prompted
- The recovery process will continue automatically up to the Welcome to Windows screen. Depending on the model, this process may take extended time to complete, but requires no user interaction until completion.
ASUS:
- Turn on your computer, and immediately press the F2 key until you reach the BIOS Setup Utility.
- Using the arrow keys, move to the Boot tab, disable the Boot Booster option. Save your changes and exit the BIOS.
- Restart the computer. Immediately press the F9 key while the computer is booting up.
- Select “Recover Windows to Entire HD” and press Enter.
- Press “Y” three times when asked if you are sure that you want to restore. The laptop will restore the factory settings.
Toshiba:
- Press and hold the 0 (zero) key on top of the keyboard (not the zero key on the numeric keypad) and at the same time, press the power button once to switch on your computer.
- When the Toshiba screen appears; release the 0 key.
- If prompted select 32bit or 64bit operating system, click Next.
- When prompted by the warning screen; click Yes to continue with the system recovery.
- Select Recovery of Factory Default Software, and click Next.
- Select Recover to out-of-box state, and click Next again.
- Please read and acknowledge this last warning screen. Click Next to start recovery.
Gateway:
Switch on your computer, press the Alt key on your computer keyboard, and then hit the F10 key during the startup process. This will redirect you to the Gateway Recovery Management program.
Next up, you need to click on the Restore System From Factory Default option and then choose the Next button to start out the restoration process. Wait for some time until the process is completed.
Lenovo:
- Press on the Novo button at the top of your keyboard, your Lenovo computer should boot up and start the Lenovo OneKey Recovery System.

- Choose Restore to factory settings from the screen and proceed for the restoration.