TRIM is an ATA command that tells the SSD controller to erase the data instead of only mark the data as deleted when a file is deleted. Have the erasing operation done ahead of time improves performance. If you find the performance of your SSD is degrading over time, try to enable TRIM or optimize the drive. In this tutorial we’ll show you how to enable or disable TRIM support for SSD (Solid State Drive) in Windows 10.
Note: Enabling TRIM will undoubtedly reduce the chances for recovering your lost files from SSD. Deleted files are erased immediately and can’t be recovered.
Part 1: Check If TRIM is Enabled
To see whether or not your SSD has TRIM enabled, open the Command Prompt with administrator privileges and run the following command:
fsutil behavior query DisableDeleteNotify
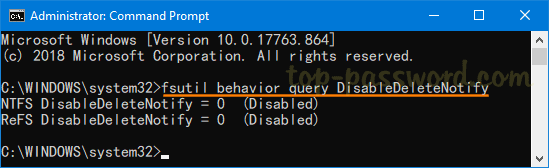
If the DisableDeleteNotify value is zero (0), it means that TRIM is enabled. If you got a result of one (1), TRIM is disabled.
Part 2: Enable or Disable Trim Support for SSD in Windows 10
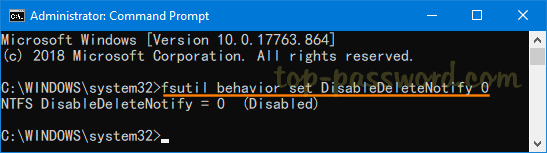
If TRIM is disabled on your SSD, you can forcibly enable TRIM by running the below command in an elevated Command Prompt:
fsutil behavior set DisableDeleteNotify 0
When you need to disable TRIM support for any reason, execute this command:
fsutil behavior set DisableDeleteNotify 1
That’s it!